Step 1: Access the RuConnect Platform**
Open the RuConnect platform at https://ruconnect.in/Step 2: Navigate to the Dashboard
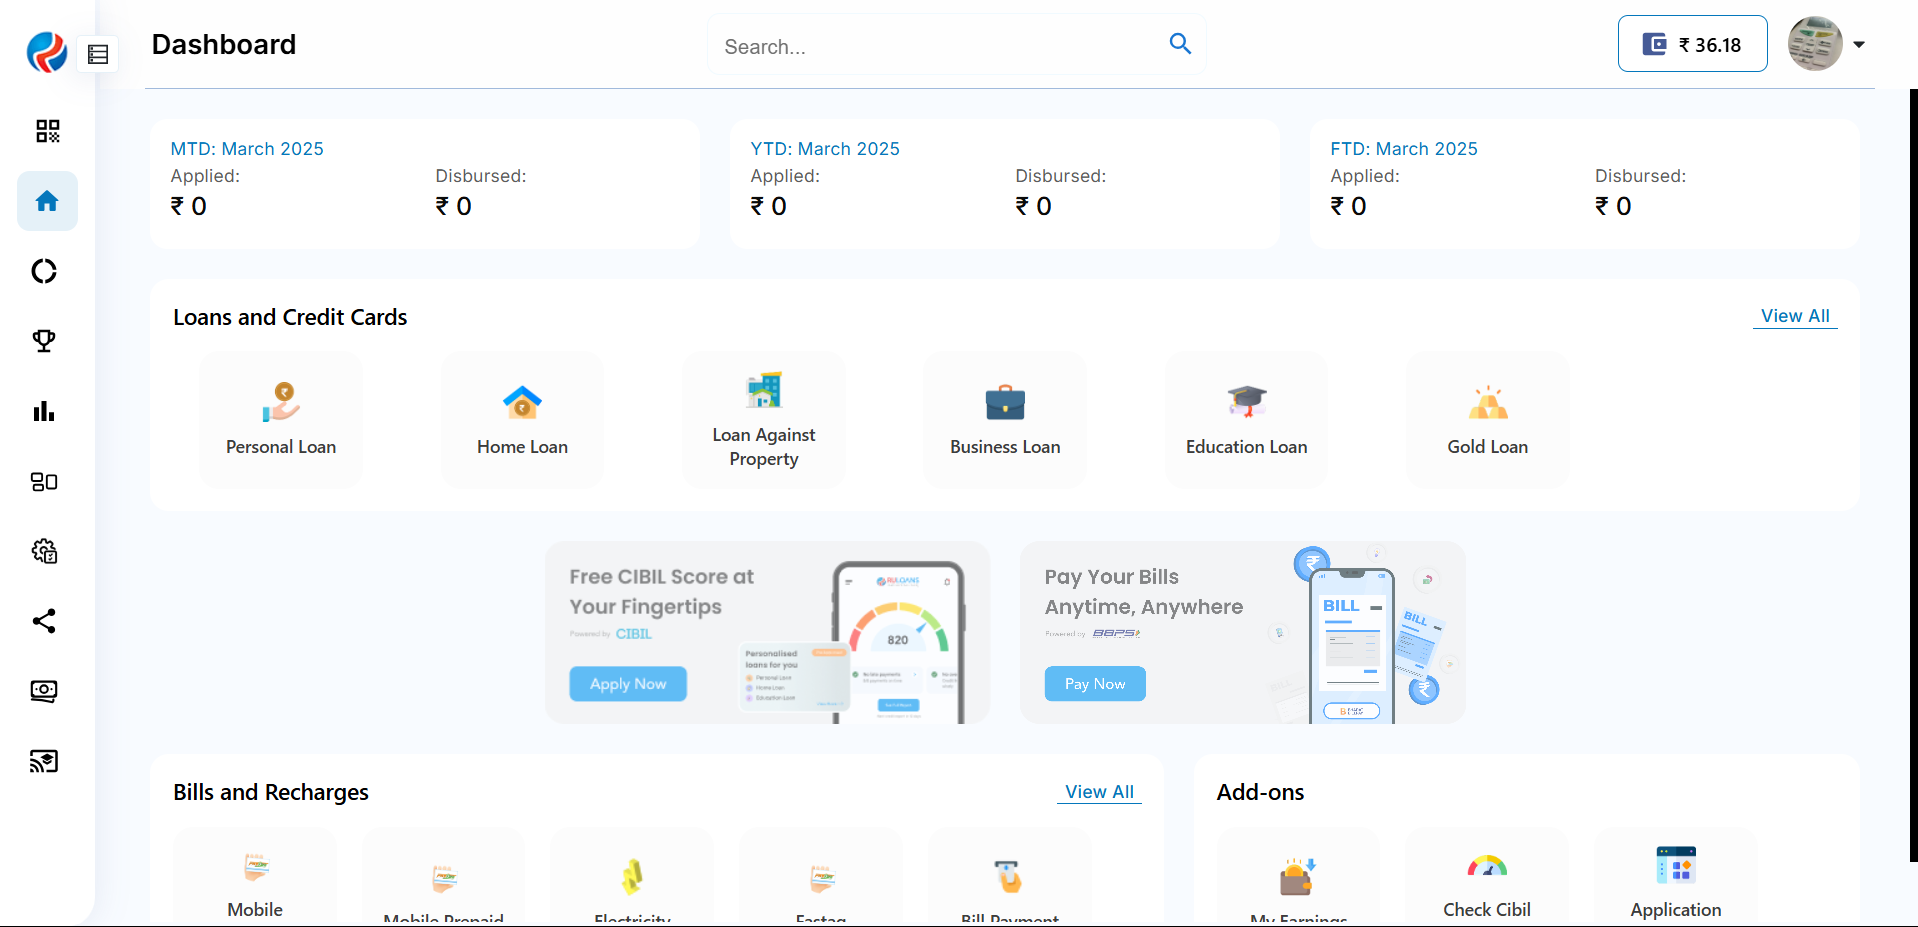
- After successful login, you will land on the Dashboard.
- The Dashboard provides:
- Quick Access Links: Links to personal loans, home loans, and other products.
- Status Overview: Displays details of ongoing or past applications
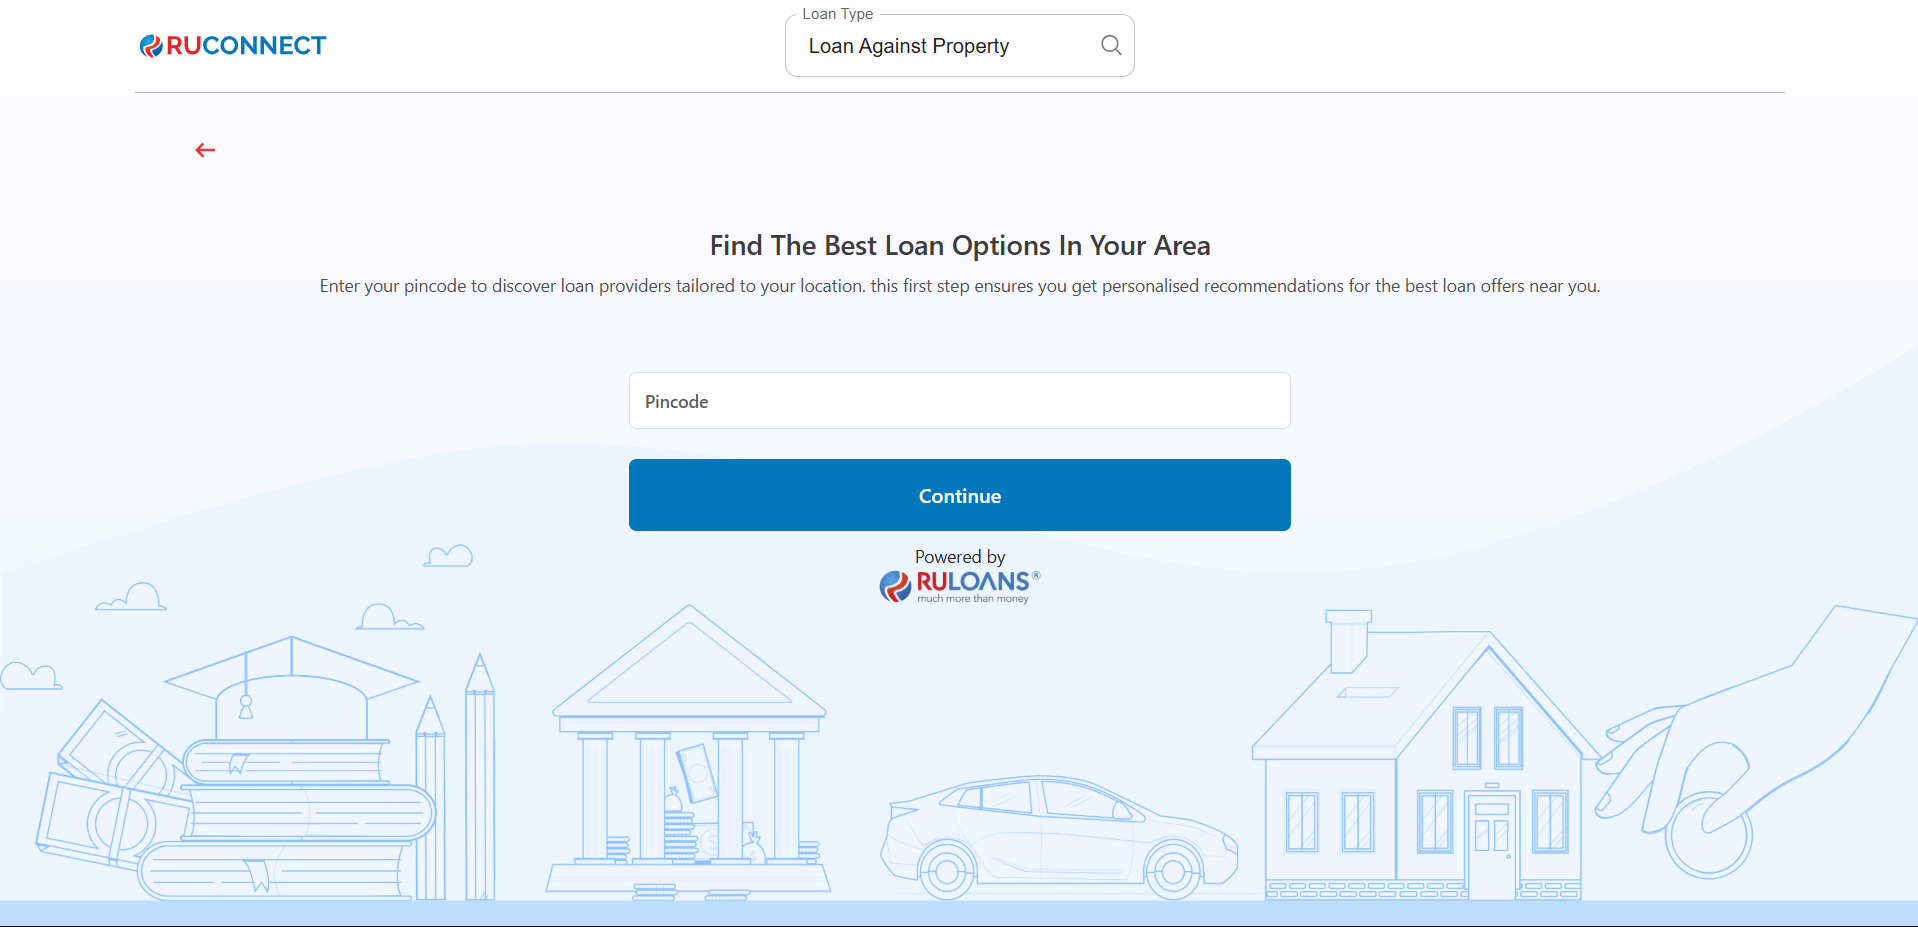
Step 3: Enter Your Pincode
- Pincode: Enter the 6-digit postal code of your residence or business address.
This helps us verify your location and show eligible offers. - Tap Continue.
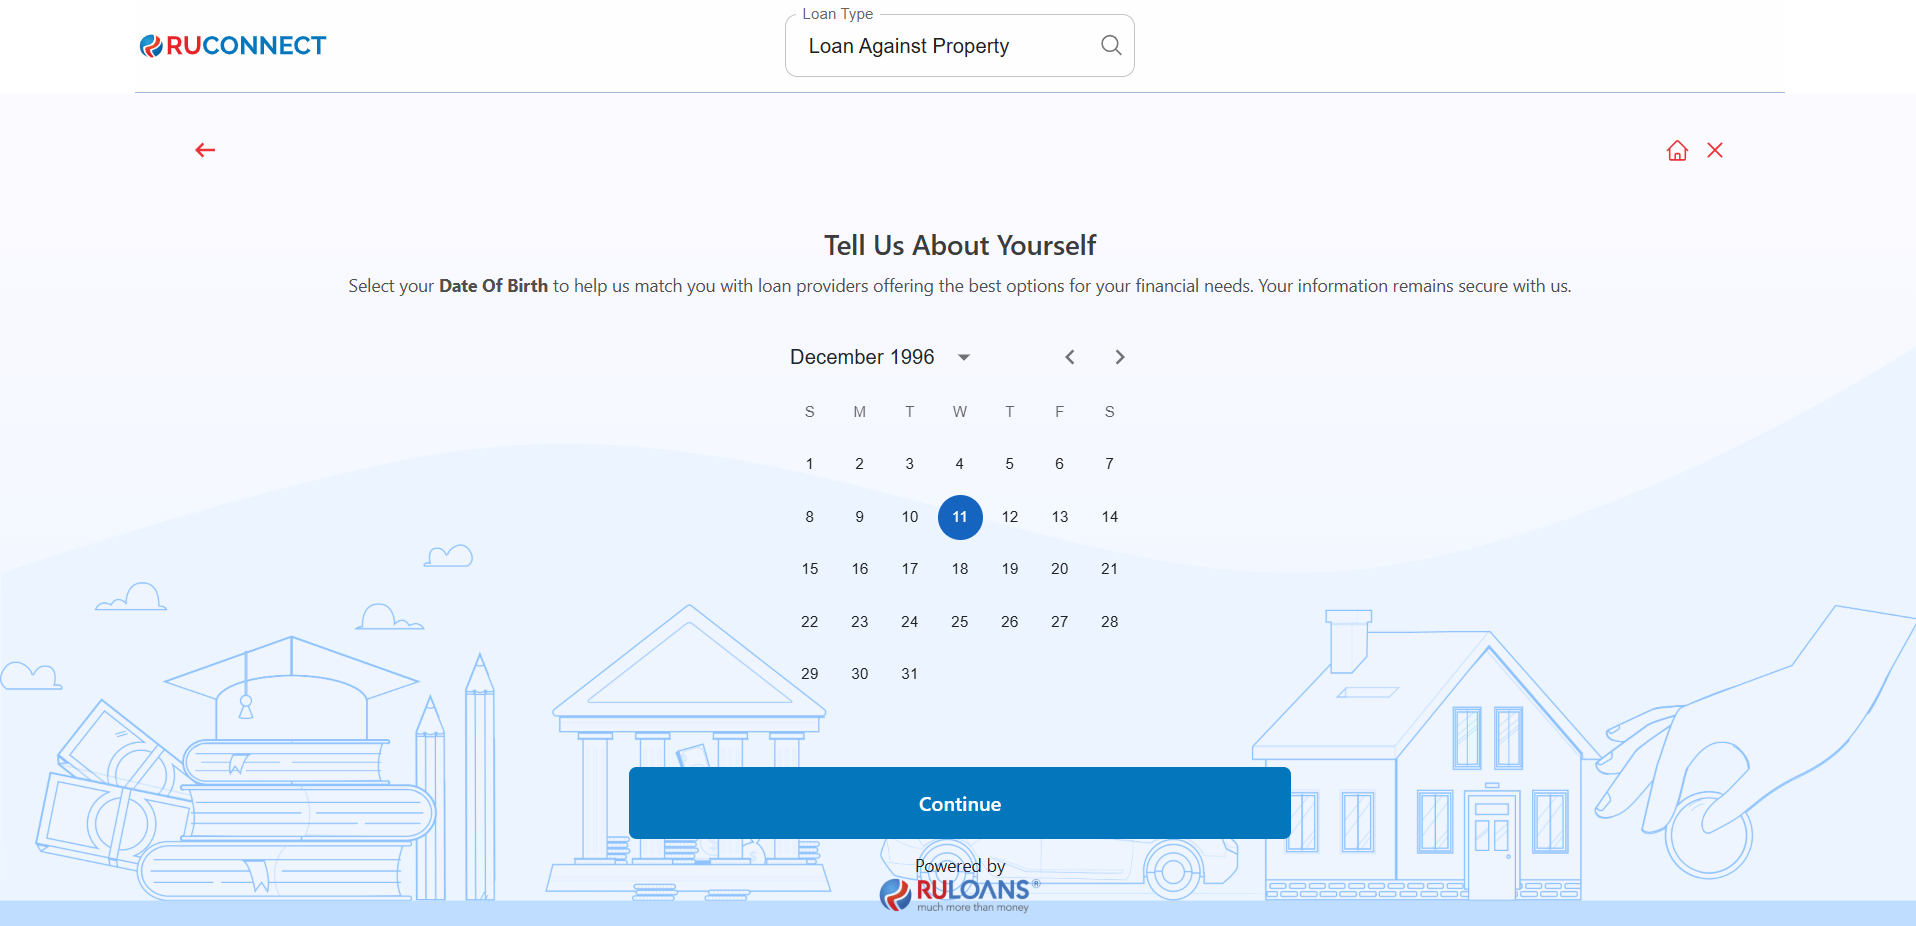
Step 4: Enter Your Date of Birth
- Date of Birth: Select your date of birth using the calendar picker.
This helps determine your eligibility and age-based offers. - Tap Continue.
Step 5: Choose Your Profession
Select the category that best describes your employment type:- Salaried - If you work for a company or organization.
- Self-Employed - If you are a freelancer, consultant, or professional.
- Business Owner - If you run a business, either registered or informal.
If Salaried:
- Company Name: Name of your employer.
- Monthly Income: Your average take-home salary each month.
If Self-Employed or Business Owner:
- Business Name / Company Name: Name of your business or profession.
- Business Turnover: Approximate annual income from your business/profession.
- Business Vintage (in months): How long you’ve been running it.
- Monthly Income: Your average net income per month.
- Tap Continue.


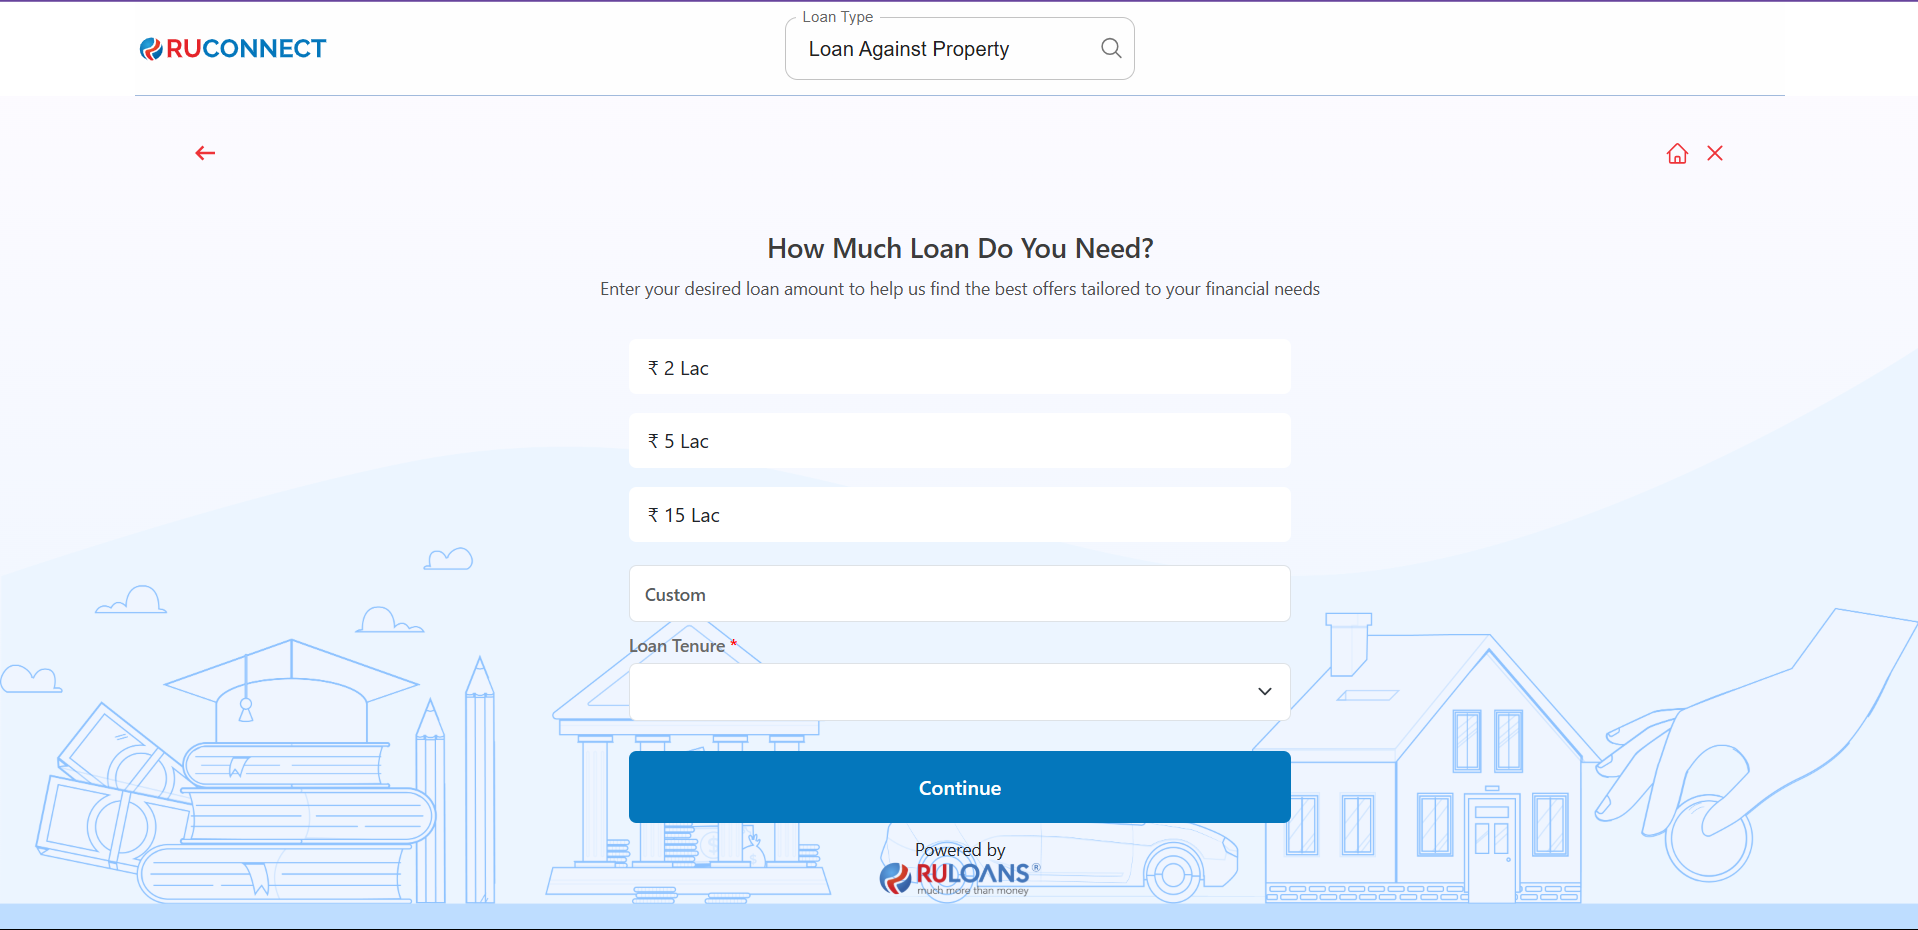
Step 6: Select Loan Amount & Duration
- Loan Amount: Choose a preset amount (e.g., ₹ 2L / ₹ 5L / ₹ 15L) or enter a Custom Amount.
- Loan Tenure: Choose the repayment period (in years).
- Tap Continue.
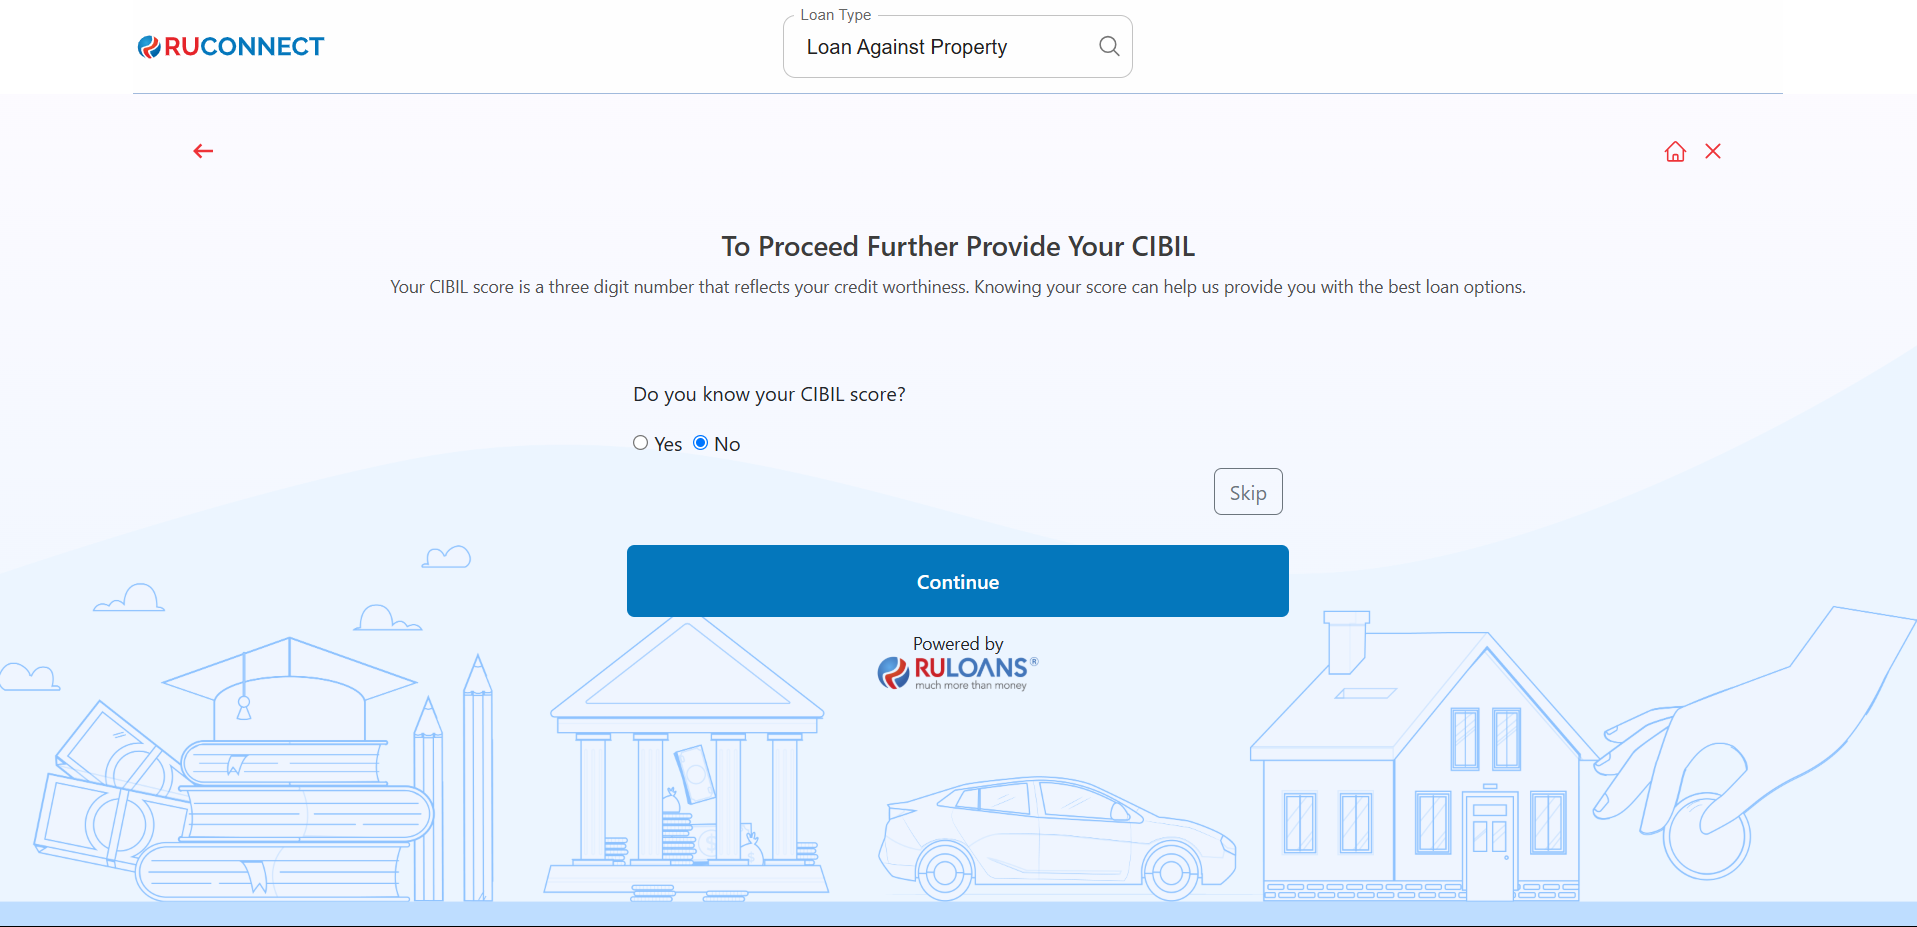
Step 7: Know Your CIBIL Score?
-
If you select Yes:
- CIBIL Score: Enter your 3-digit credit score (e.g., 750).
- Monthly EMI: Total of all active loan EMIs you’re paying.
- If you select No: User will be redirected to Step 8.
- If you Tap Skip: User will be redirected to Step 10.
- Tap Continue.

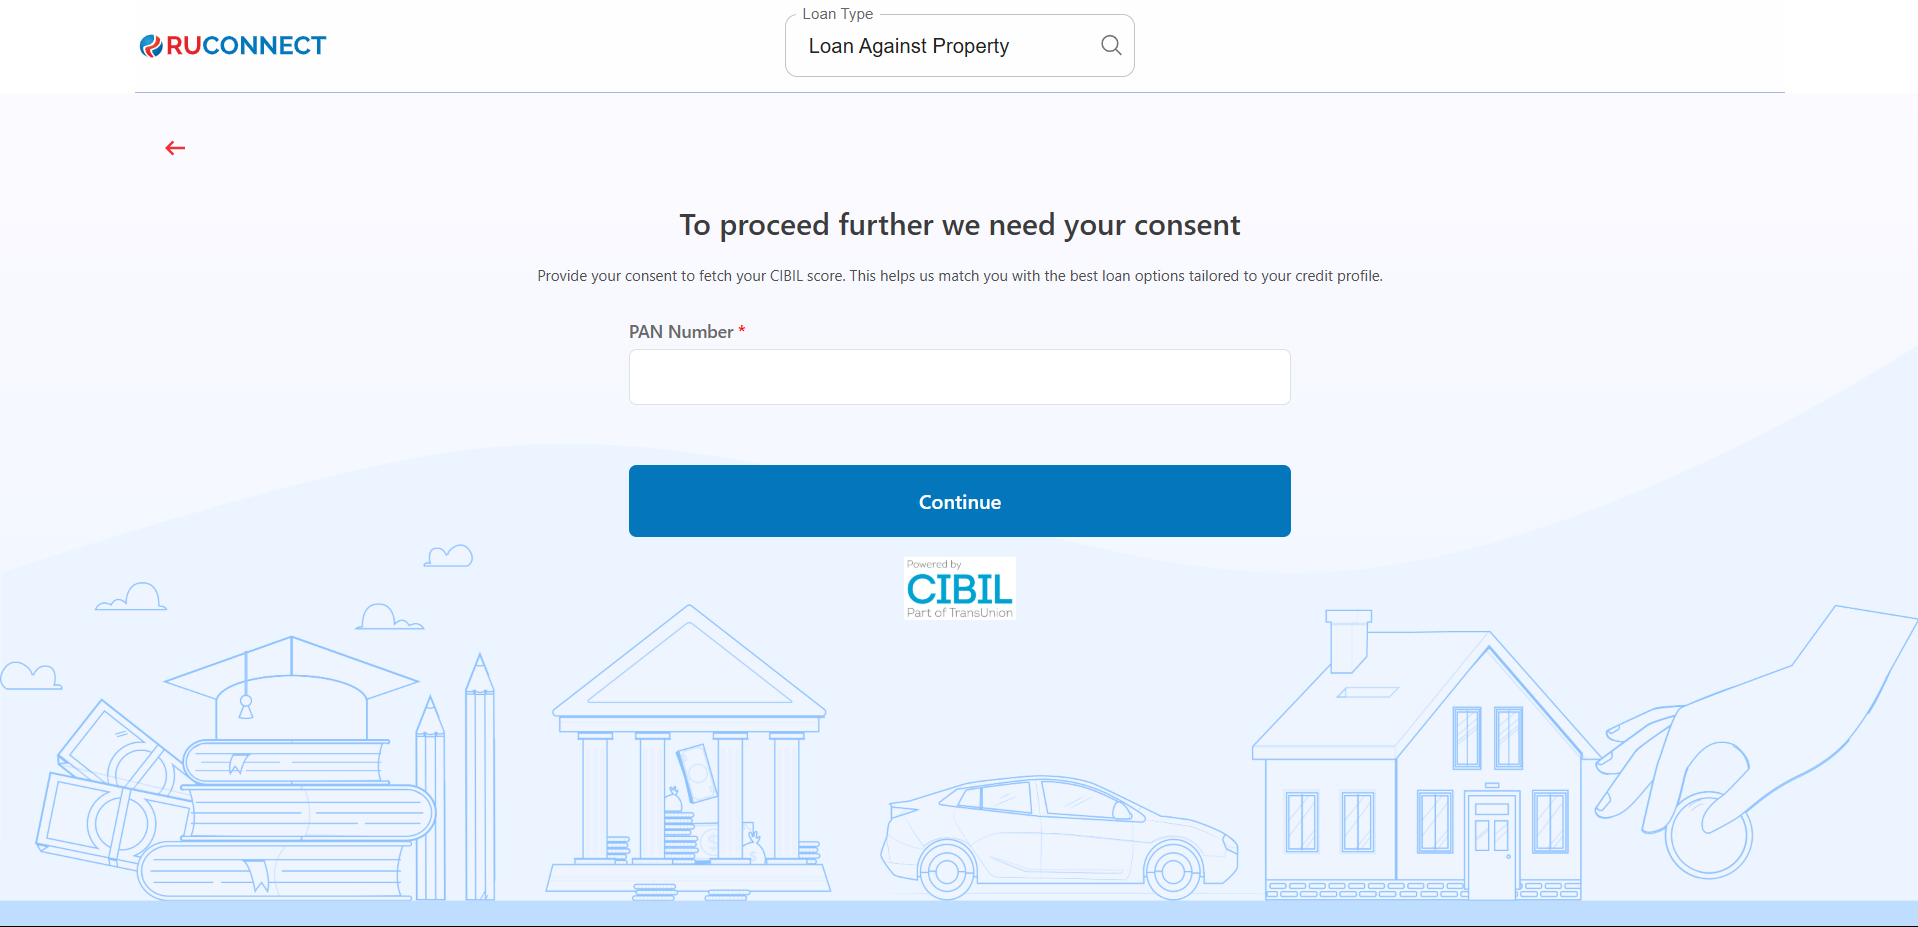
Step 8: Enter PAN Number & Give Consent
- PAN Number: Enter your 10-character PAN (e.g., ABCDE1234F).
Required to verify your credit score and match loan offers. - Tap Continue.
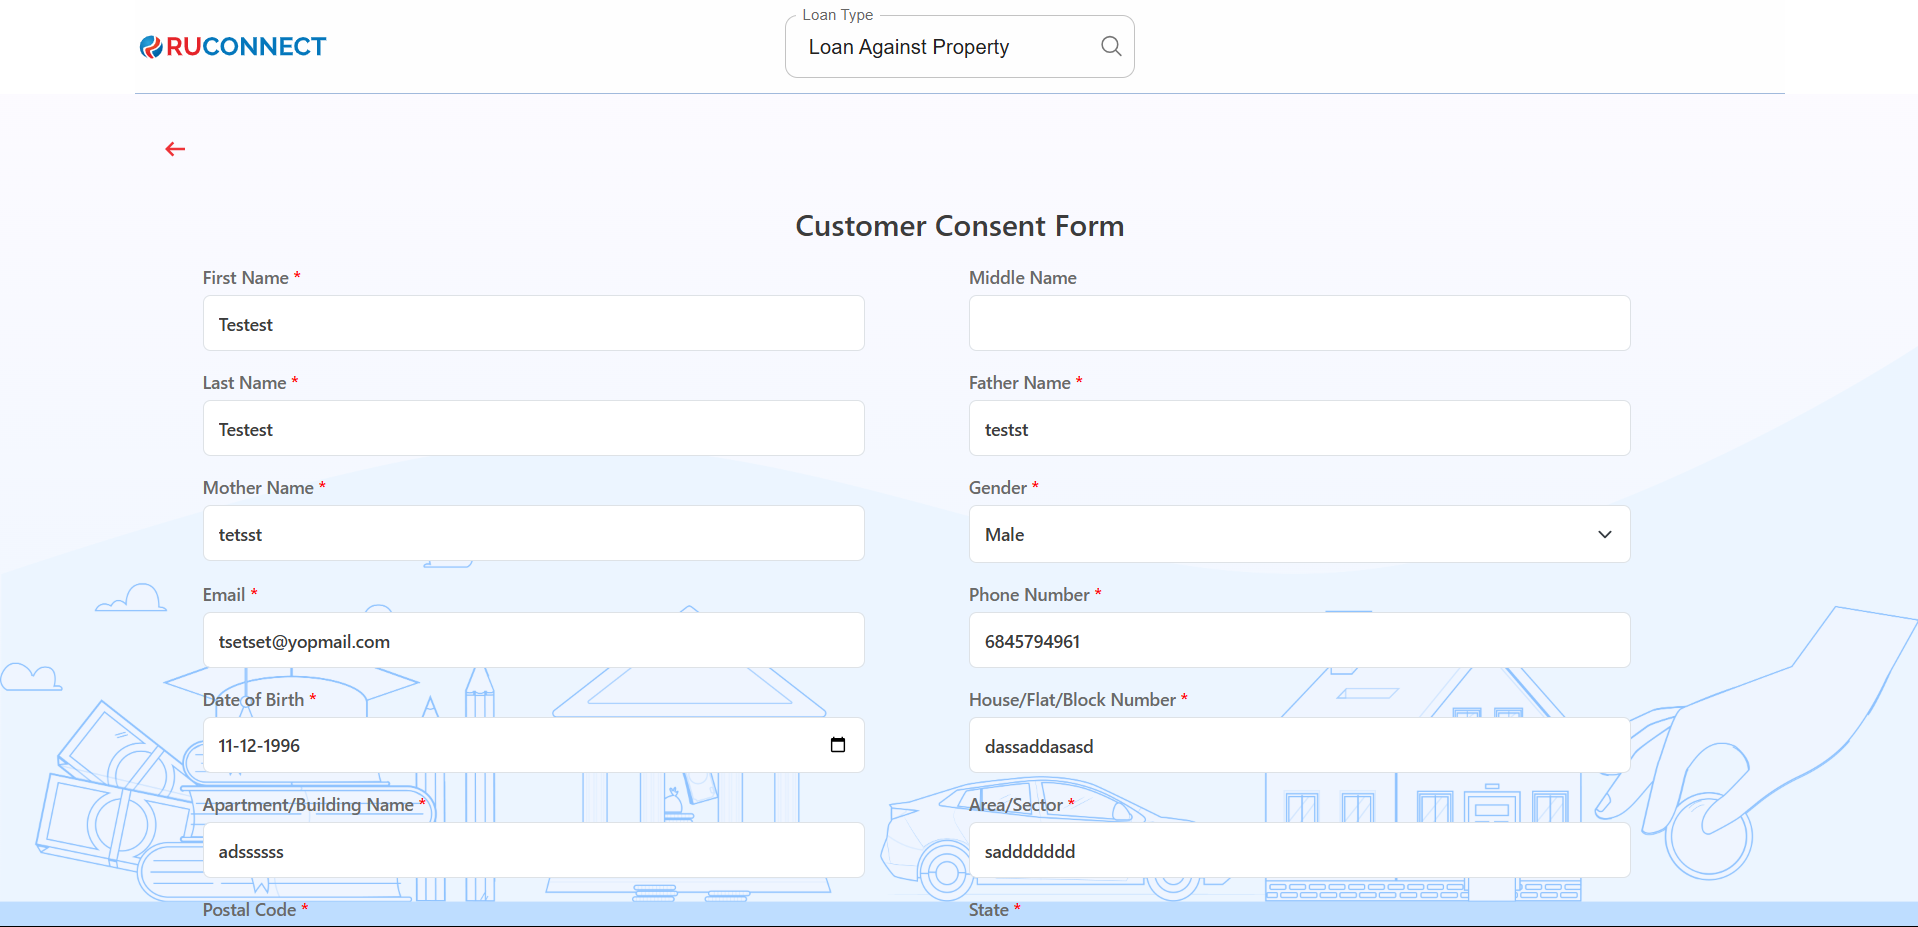
Step 9: Fill Personal & Address Details for CIBIL
Personal Details- First Name: Enter your First name.
- Middle Name: Enter your Middle name (optional).
- Last Name: Enter your Last name.
- Father’s Name: Enter your Father’s full name.
- Mother’s Name: Enter your Mother’s full name.
- Gender: Select your gender from the dropdown.
- Email ID: Enter your email ID.
- Mobile Number: Enter your mobile number.
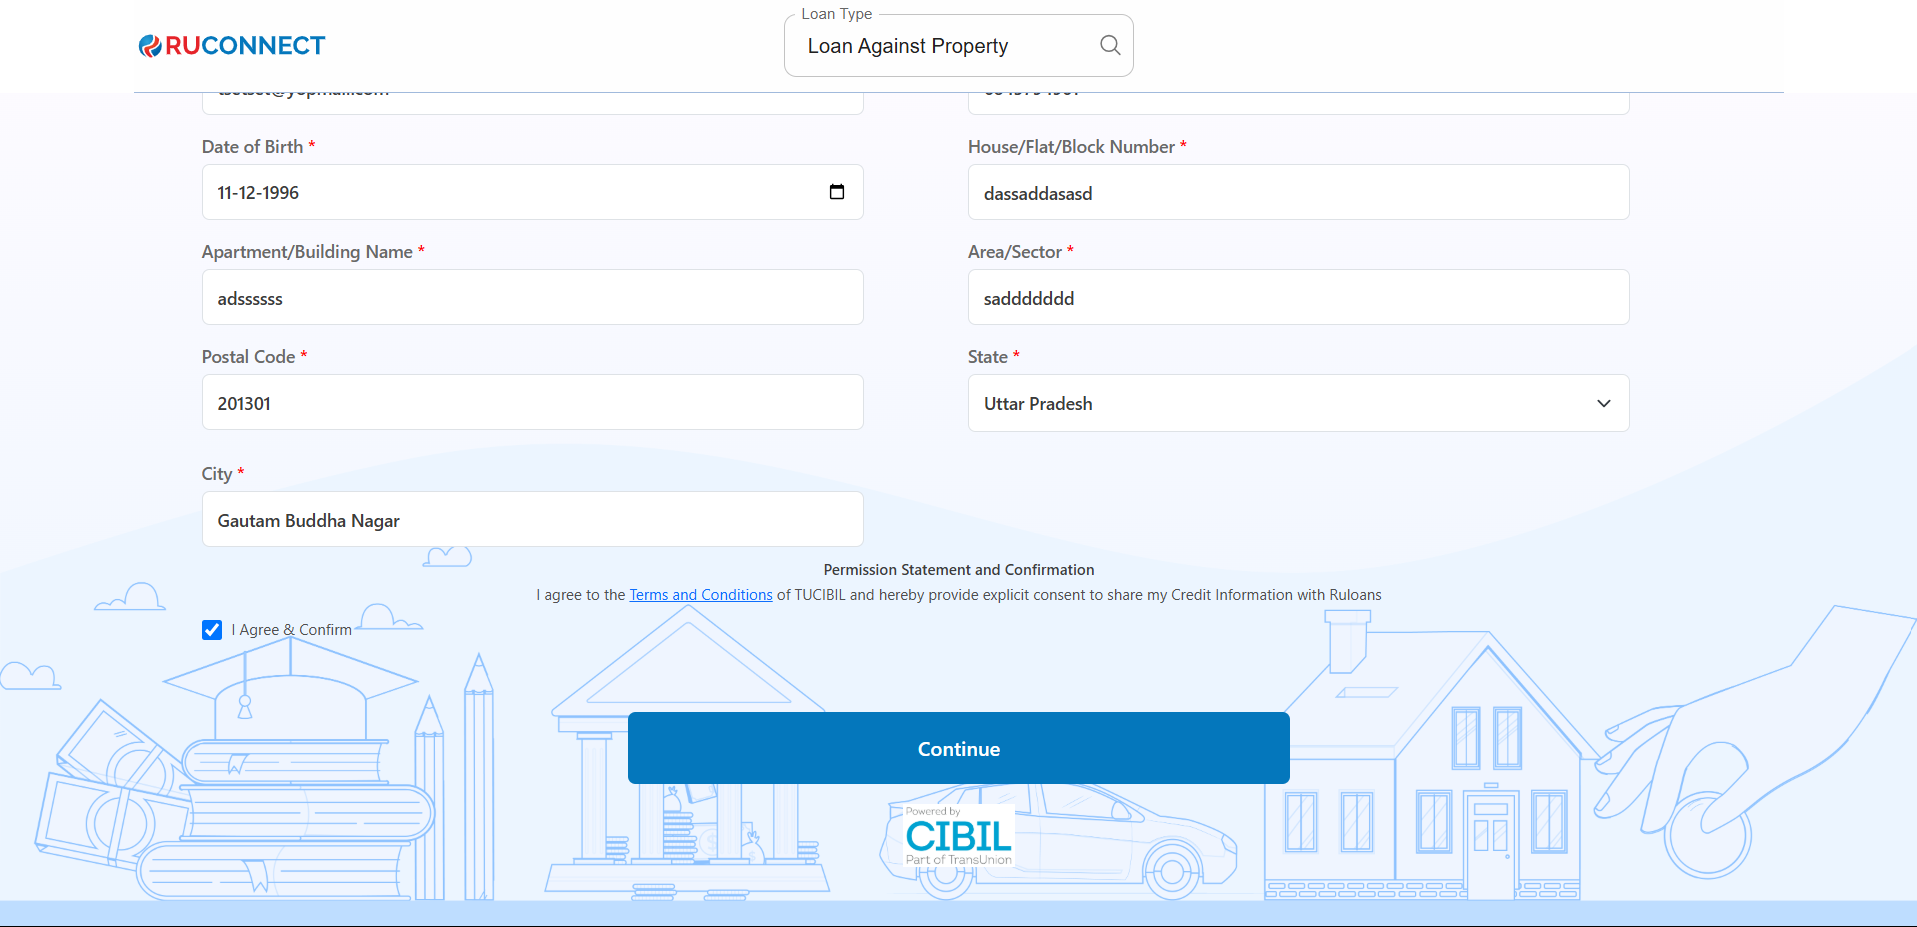
- Date of Birth: Enter your date of birth.
- House / Flat / Block Number: Enter the house/flat/block number of the address.
- Building / Apartment Name: Enter the building/apartment name of the address.
- Area / Sector: Enter the area/sector of the address.
- Pincode: Enter the pincode of the address.
- City: Select the city from the dropdown.
- State: Select the state from the dropdown.
You may review the Terms & Conditions.
Tap Continue
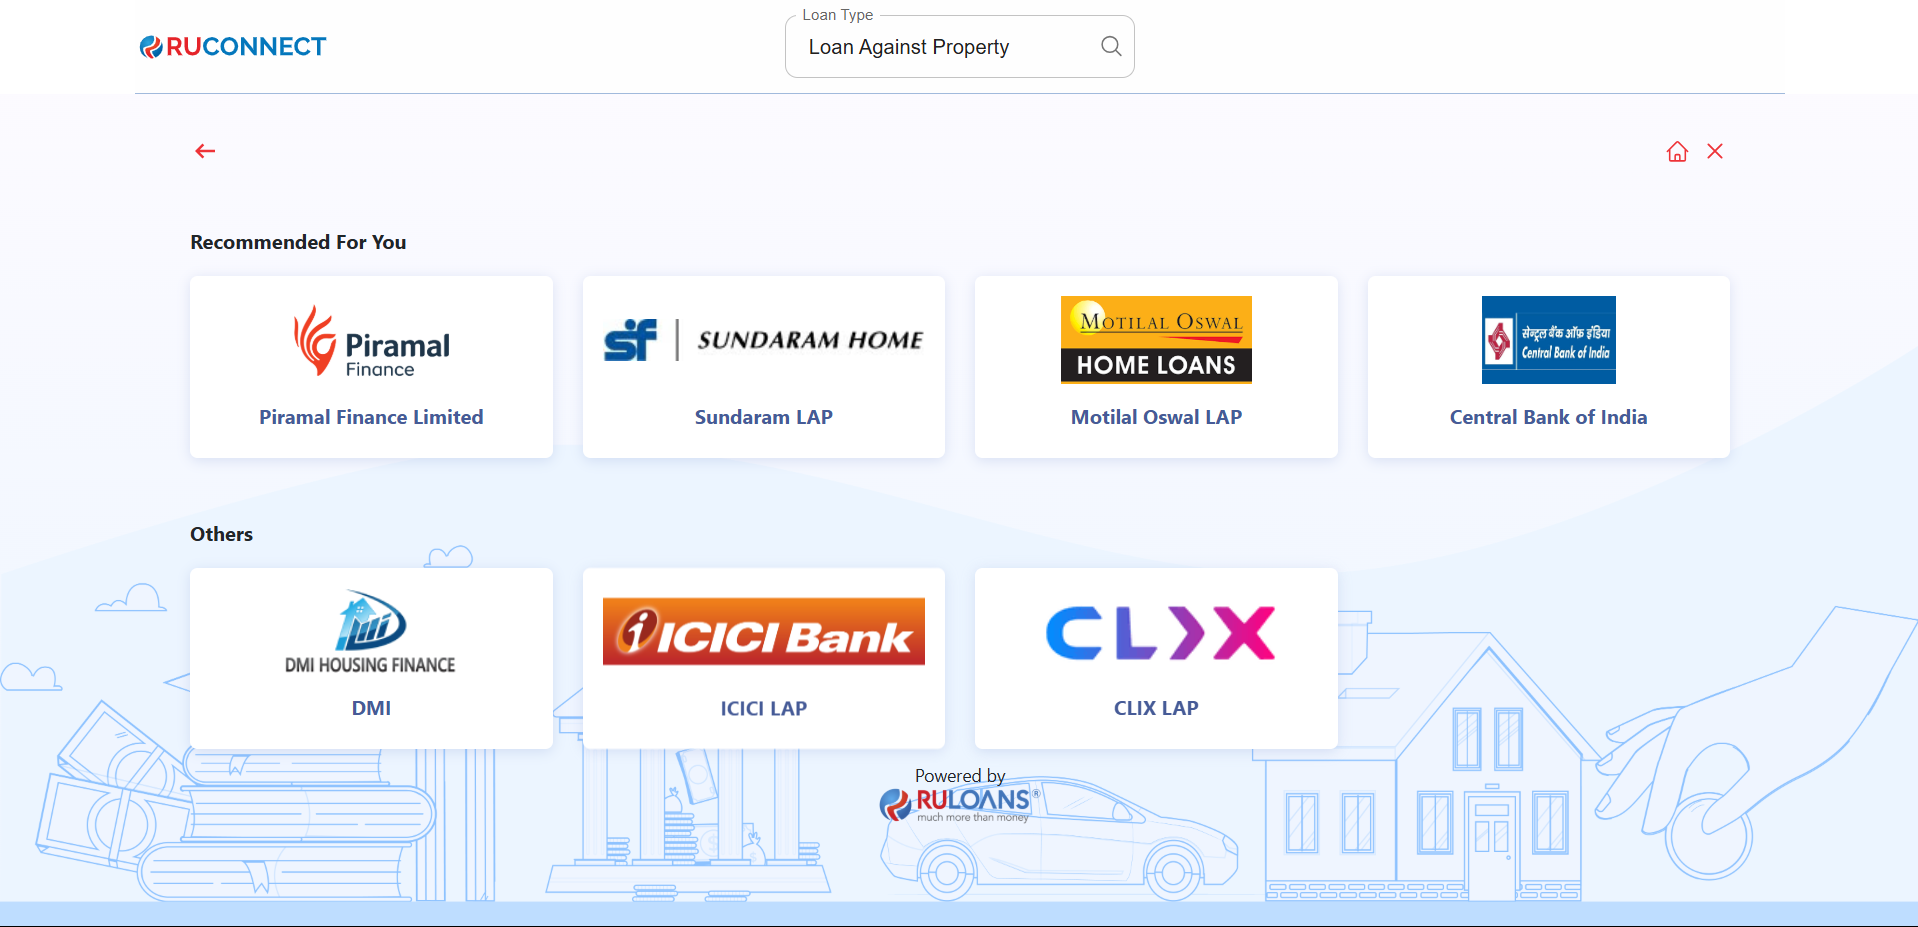
Step 10: Get Your Recommended Offers
- Based on your details, view loan offers from lenders like:
- Motilal, Sunadaram, Piramal Finance, DMI, and more.
Step 11: Customer PAN & Mobile Number Entry
This screen is used to collect the customer’s mobile number and PAN (Permanent Account Number), which are essential for identity verification and loan processing.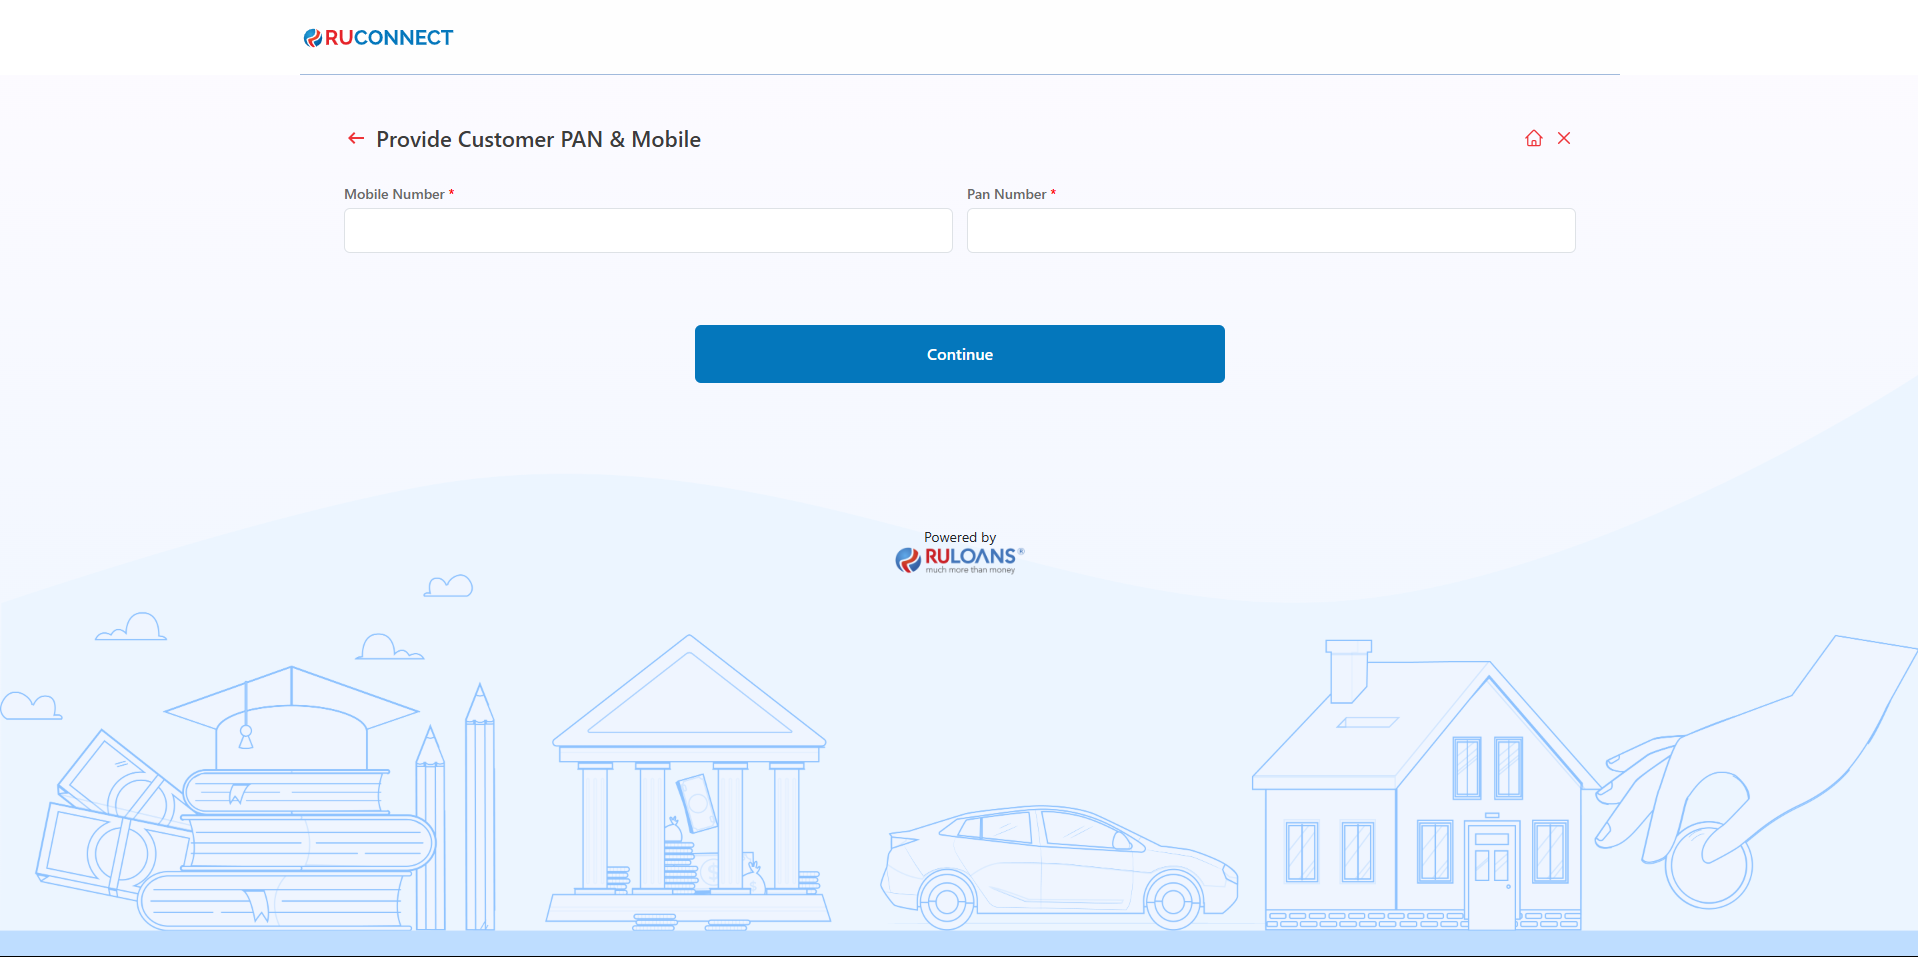
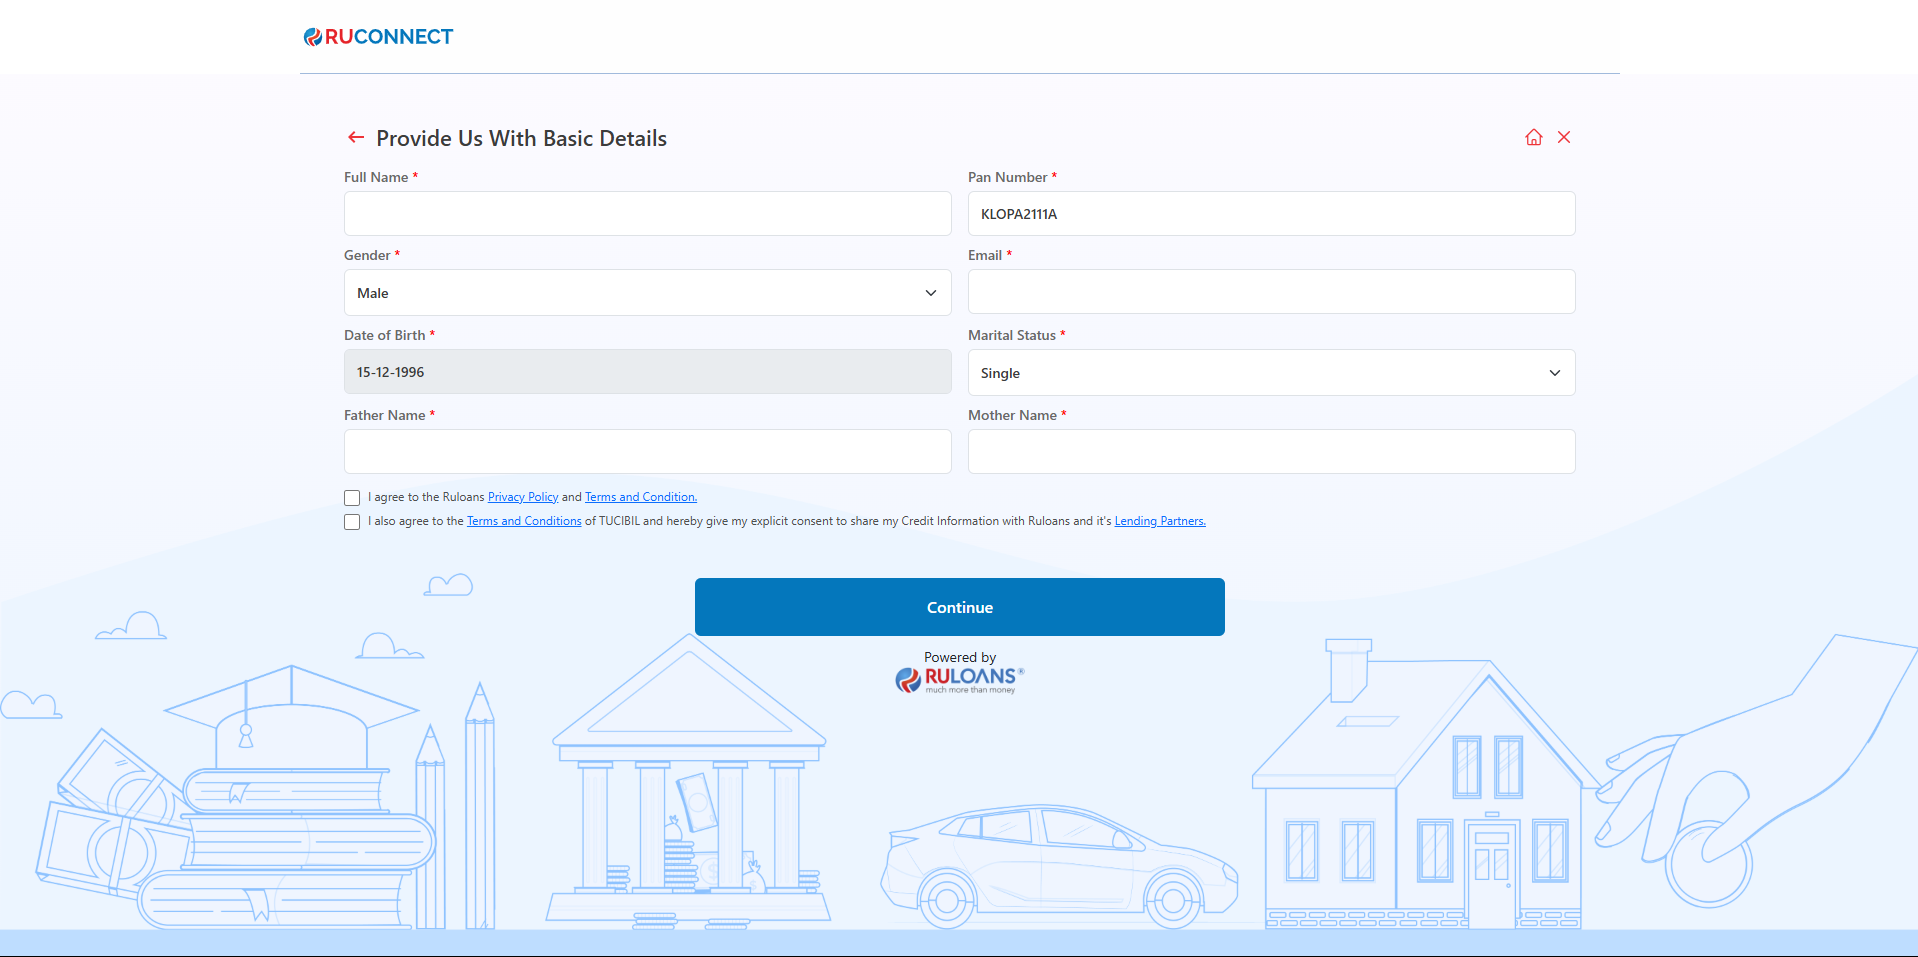
Step 12: Provide Basic Details
- Mandatory Fields:
- Full Name, PAN Number, Gender, Email, Date of Birth, Marital Status, Father’s Name, and Mother’s Name.
- Consent:
- Select checkboxes for Privacy Policy and Credit Information consent.
- Action:
- Click Continue to proceed.
Step 13: OTP Verification
Enter the One-Time Password (OTP) sent to the registered mobile number for verification.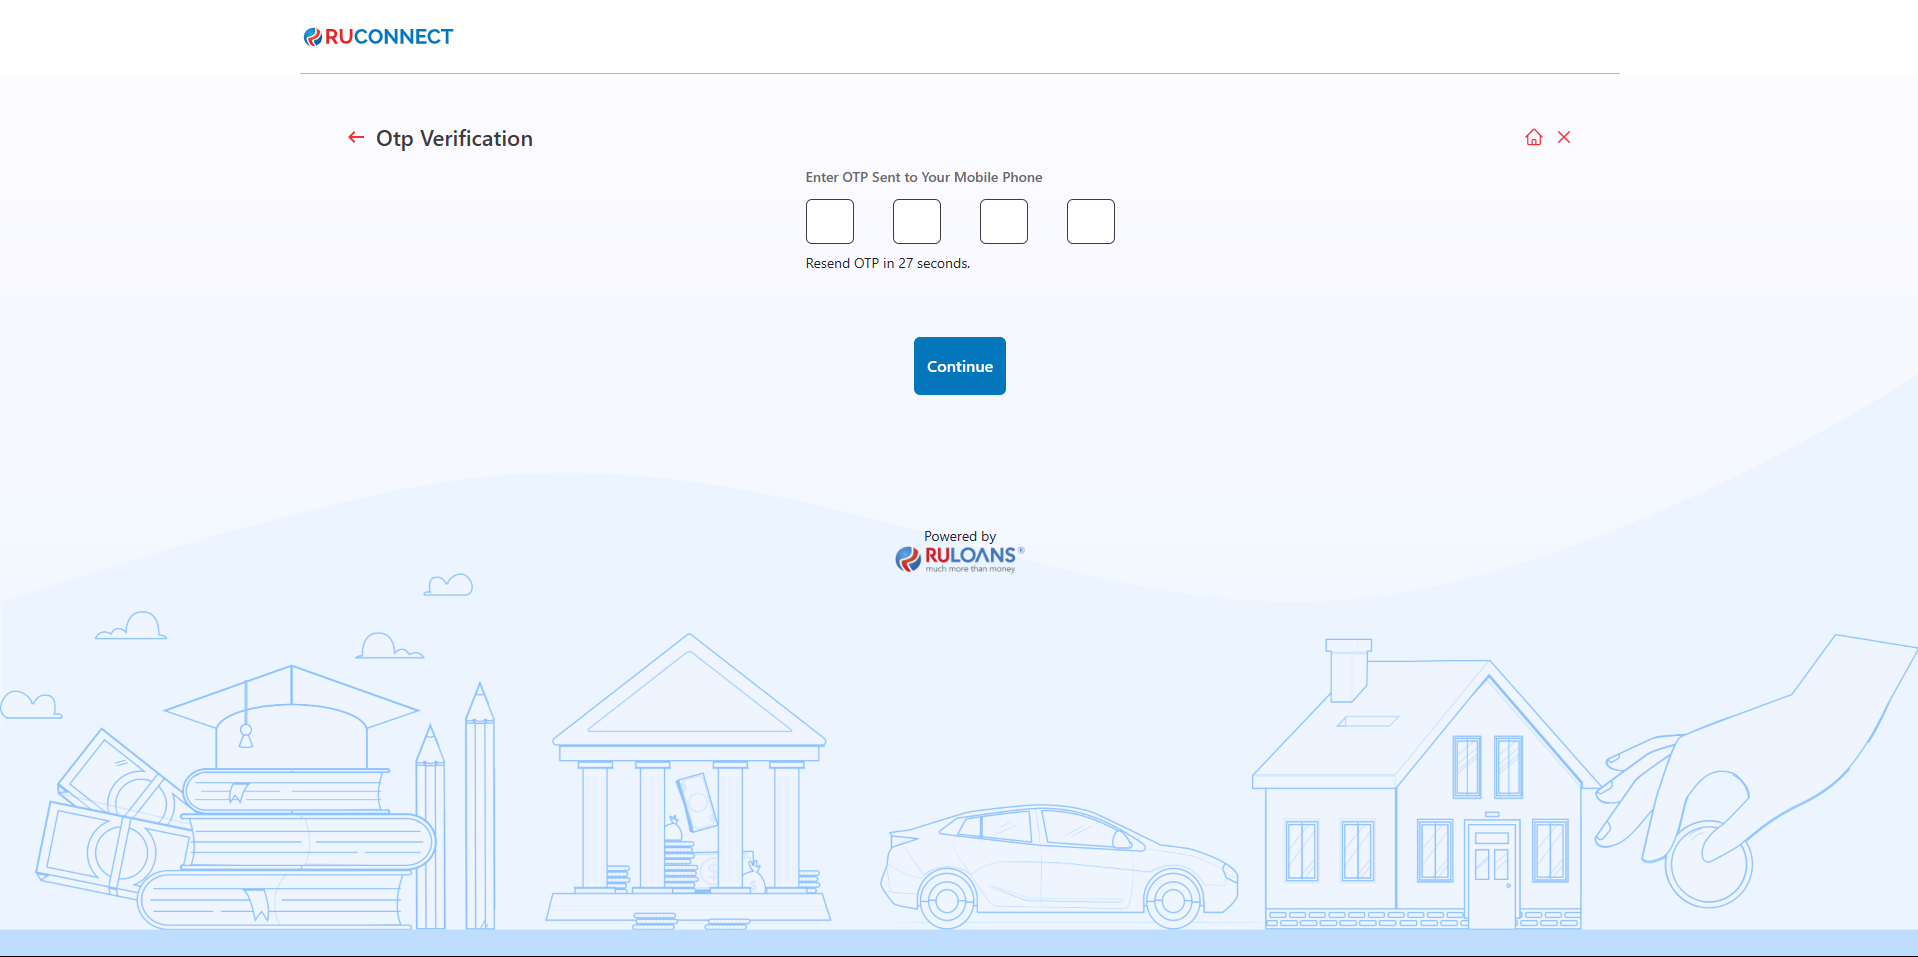
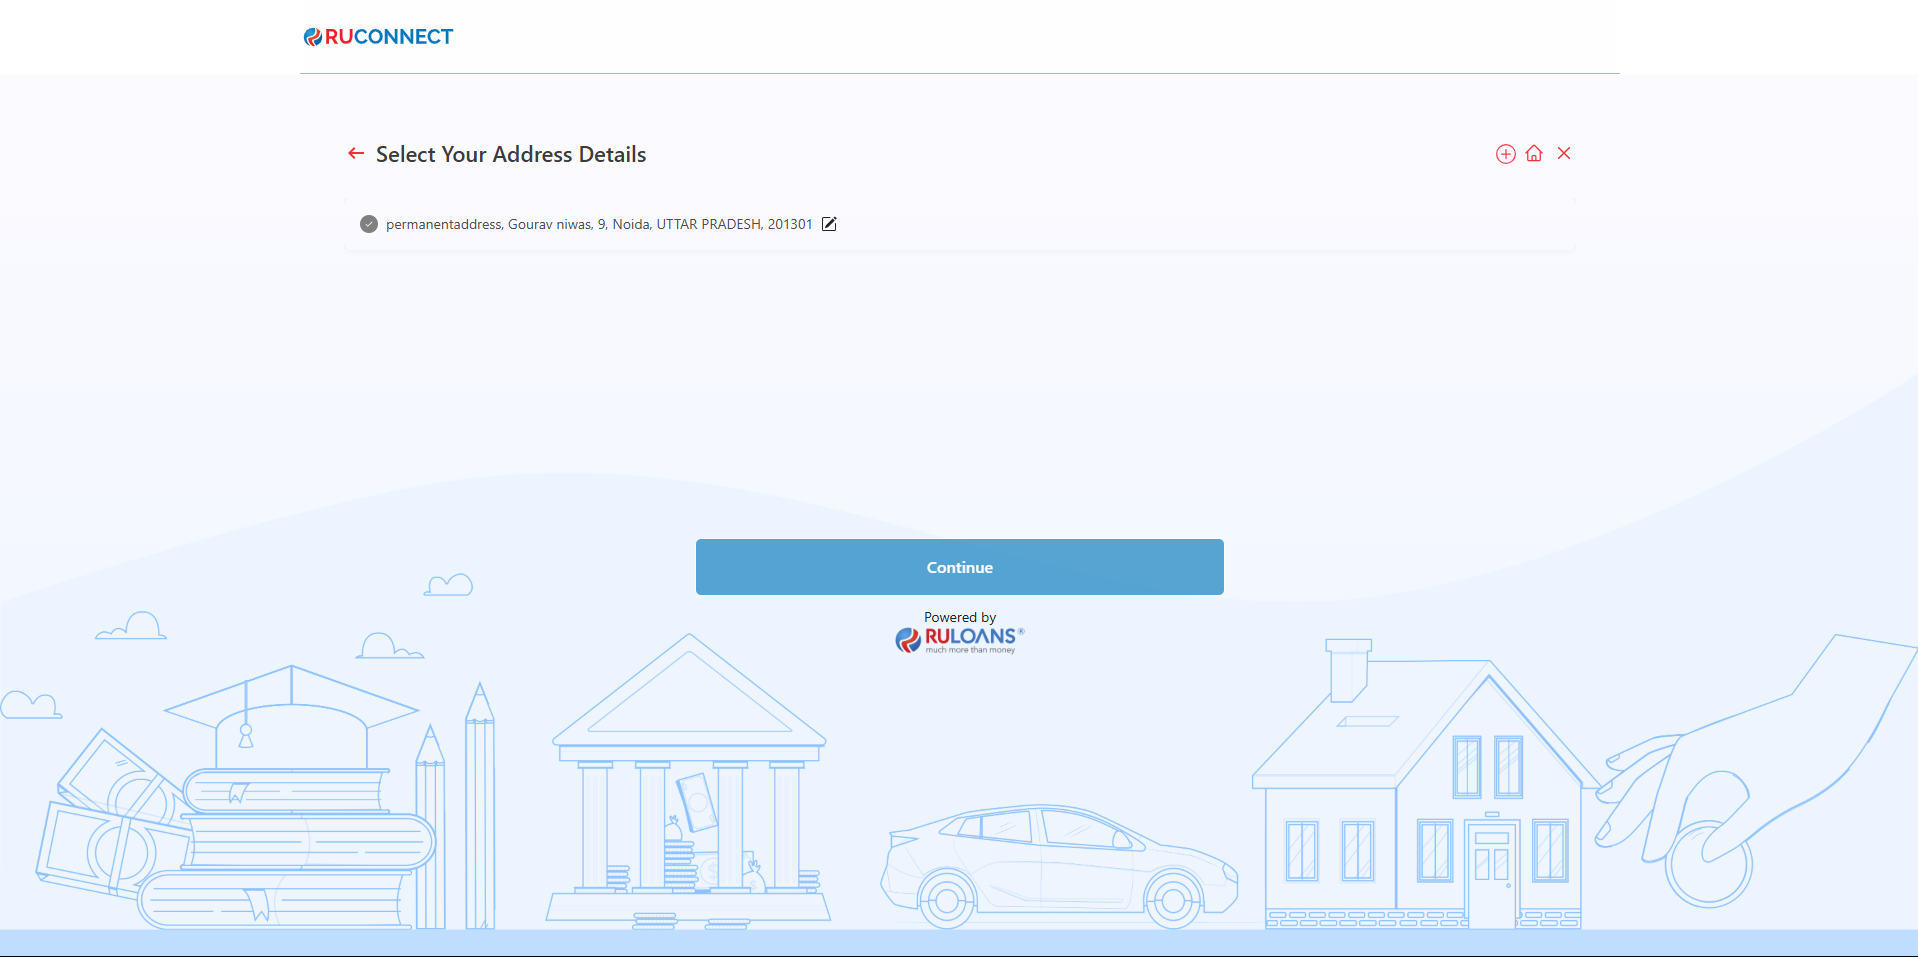
Step 14: Enter Address Details
- Provide your residential address:
- House/Flat Number (Mandatory)
- Street/Locality (Mandatory)
- City, State, and PIN Code (Mandatory)
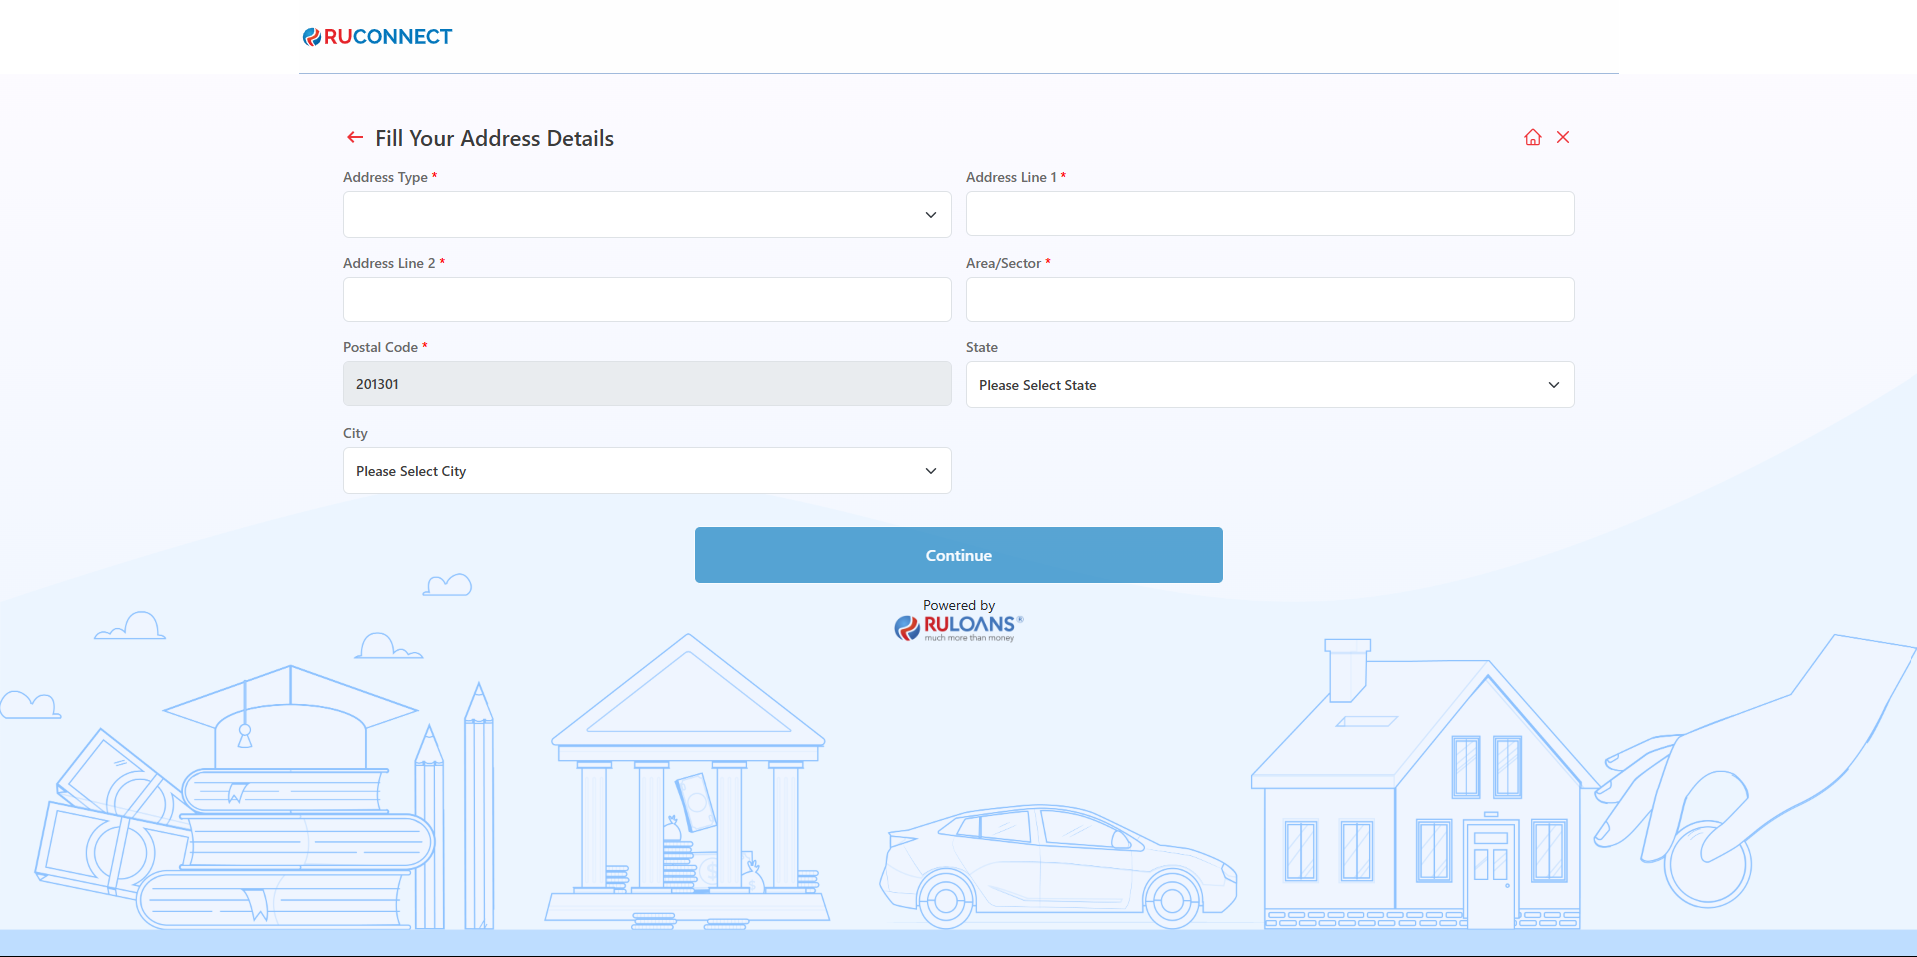
- If applicable, enter the address already saved (Optional).
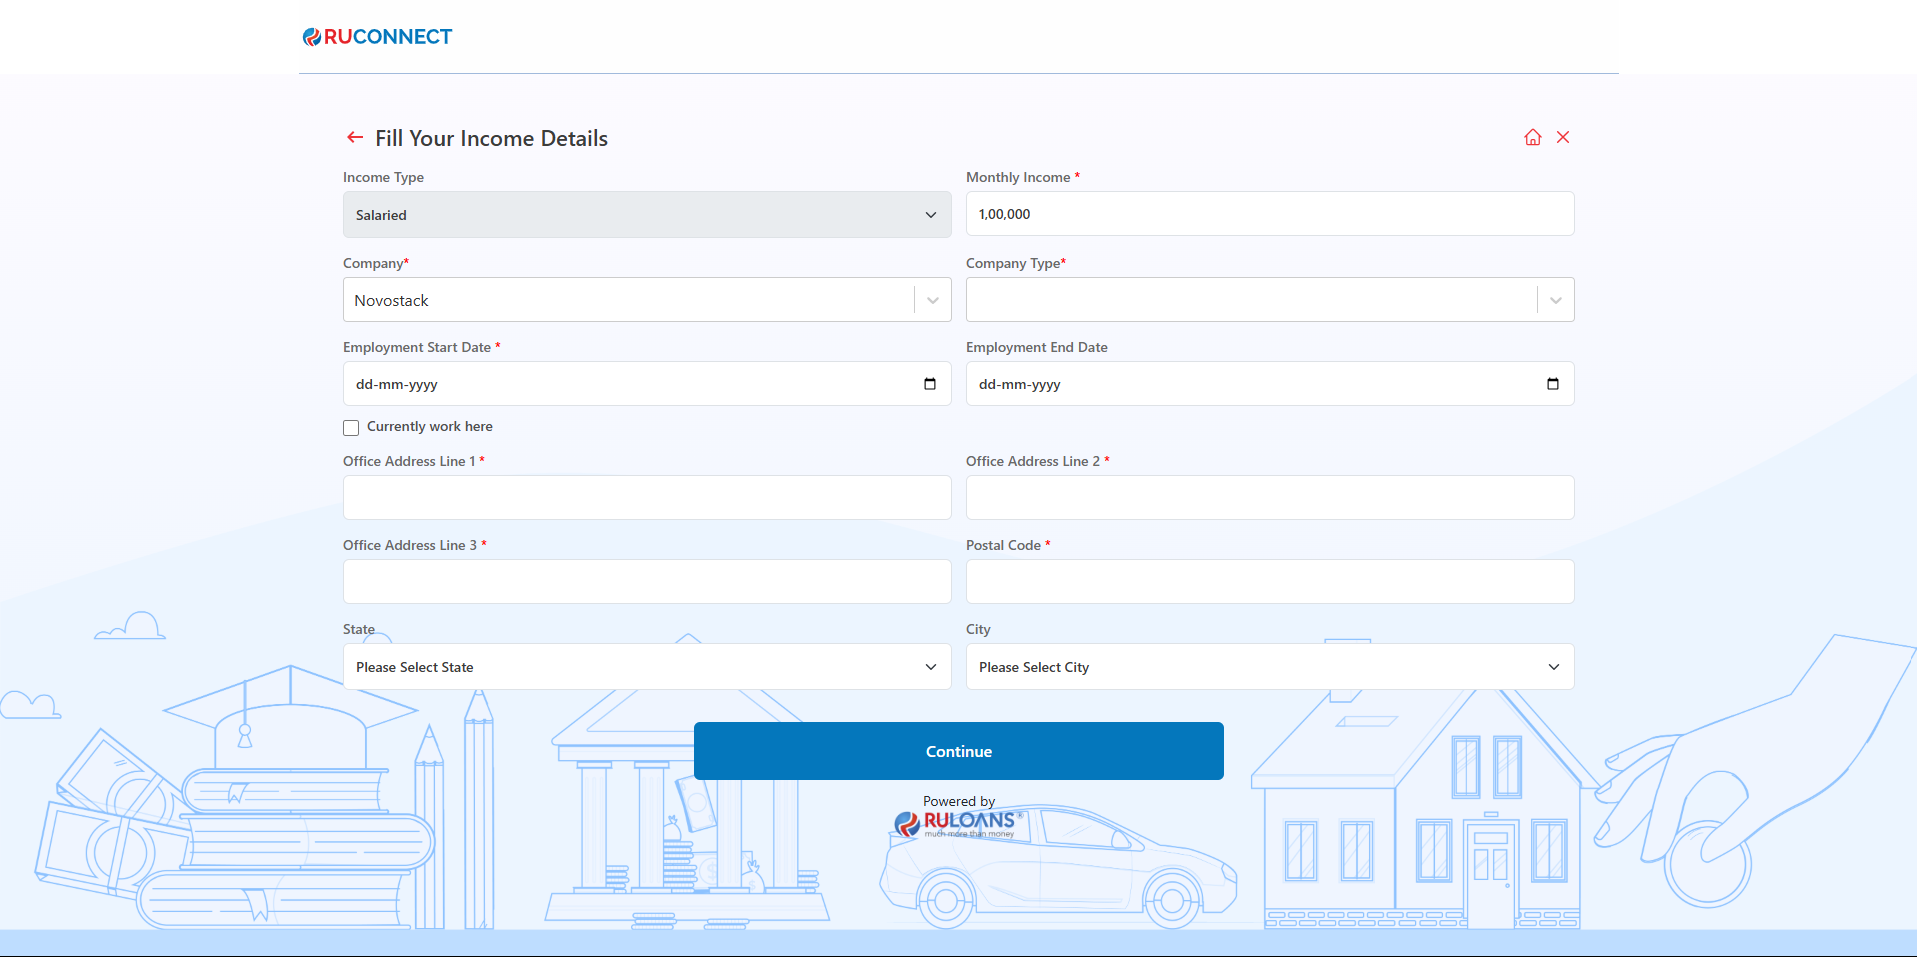
Step 15: Fill Your Income Details
- Purpose: The form collects details about the applicant’s income and employment information to assess their financial stability.
- Fields to Fill:
- Income Type: Choose between options like salaried, self-employed, etc.
- Monthly Income: Enter the monthly income in numeric value.
- Company: Specify the name of the employer.
- Company Type: Choose the type of company (e.g., private, government, etc.).
- Employment Start and End Dates: Input the tenure of employment.
- Option to mark “Currently Work Here” for ongoing employment.
- Office Address: Enter the detailed office address (Line 1, Line 2, Line 3, Postal Code).
- State and City: Select the state and city from dropdown menus.
- Action Button: Continue - Once all fields are filled, the user proceeds to the next step.
Step 16: Verify Income Details
- Select Income Details as part of the income verification process:
- Monthly Income: Enter your gross income (Mandatory).
- Income Source: Choose from the dropdown menu (e.g., Salaried, Self-employed) (Mandatory).
- Employer Details: Enter your organization’s name (Mandatory).

Step 17: Provide Loan Details
- Loan Amount:
- Enter the desired loan amount in the input field (Mandatory).
- Loan Tenure:
- Choose the loan tenure from the dropdown menu (e.g., 2 Years, 3 Years) (Mandatory).
- Business Vintage (in Months):
- Provide the duration of your business operation in months (Optional, if applicable).
- Business Turnover:
- Specify your business’s annual turnover (Mandatory).
- After completing the fields, click on the Continue button to proceed to the next step.
 NOTE: The Fields Business Vintage and Business Turnover is only applicable for Self Employed Customers
- For Salaried Users
- For Self Employed Users
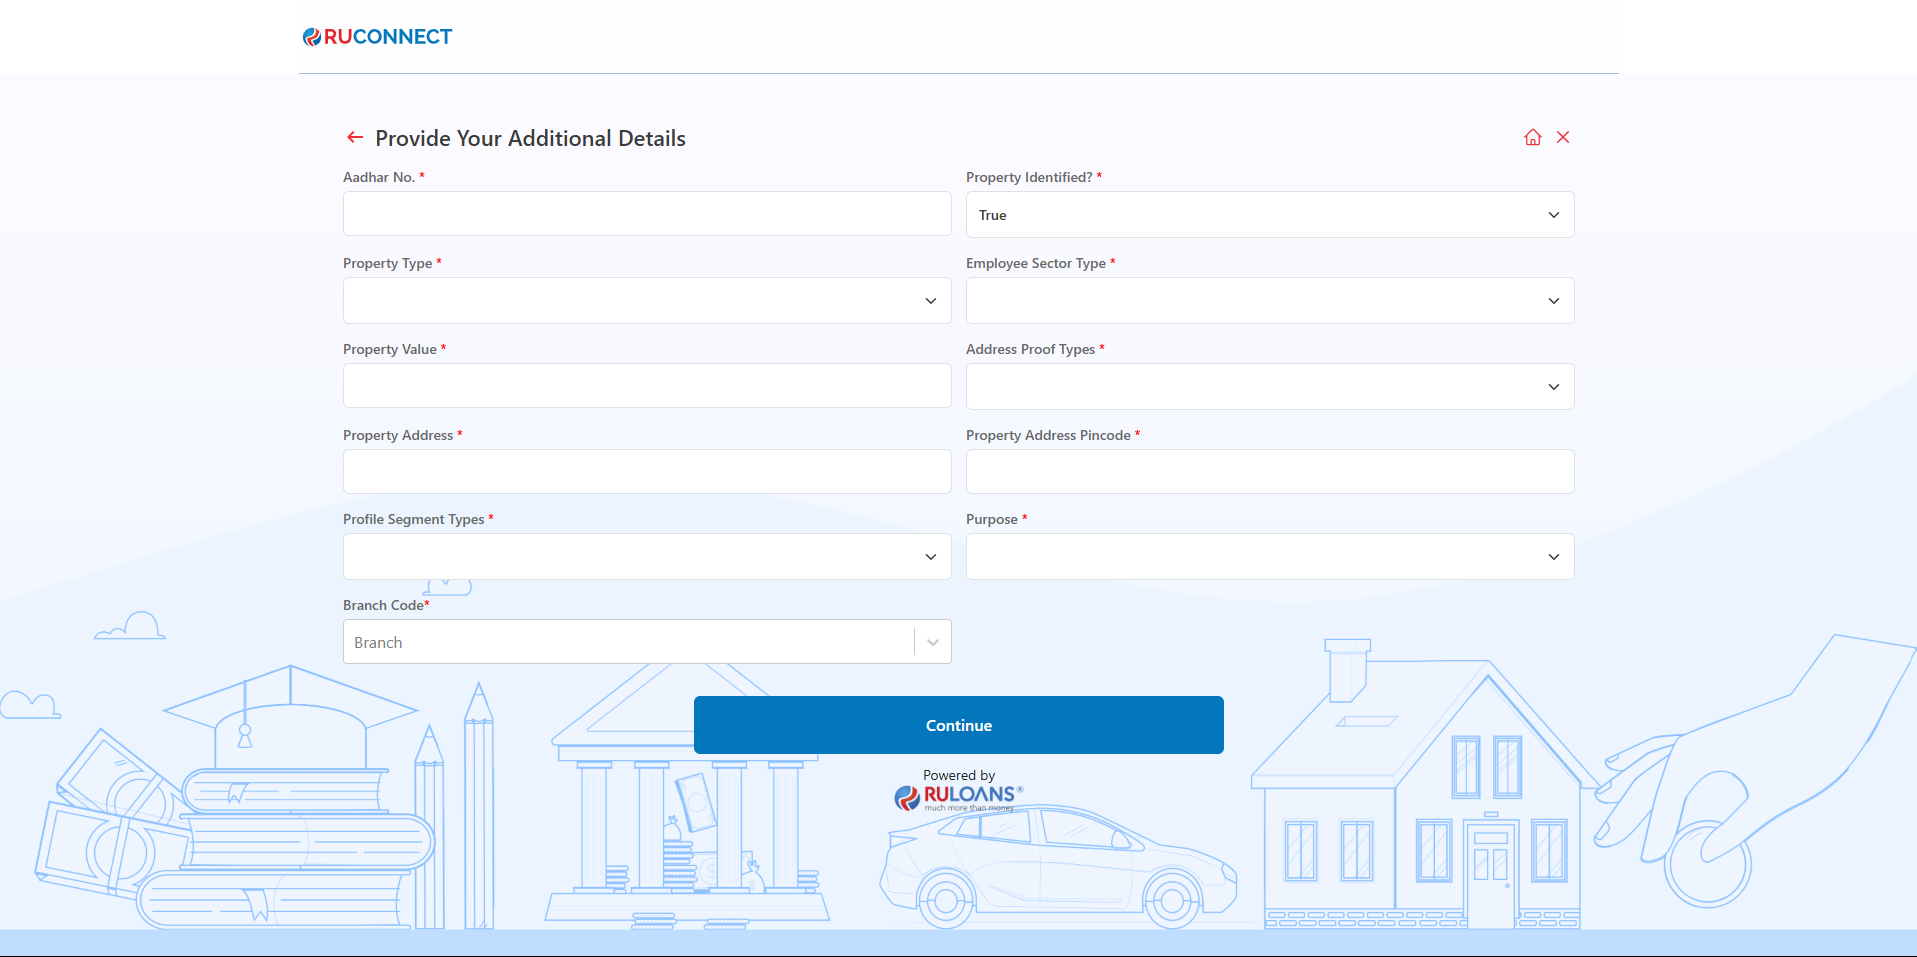
Step 18: Additional Details Submission Description:
This step involves the borrower providing additional details required for processing their home loan application. The interface, as seen in the image, displays various fields capturing essential information related to the applicant’s financial and property details. Key Requirements:- Aadhaar Number – The borrower must input their Aadhaar number for identification and verification purposes.
- Property Identified? – A dropdown option where the borrower confirms whether they have identified the property for which the loan is being sought.
- Property Type – Selection of the type of property, such as a DA Authority Approved Map.
- Employee Sector Type – Specifies the borrower’s employment sector, such as “Private Ltd”.
- Property Value – The estimated market value of the property, entered in Indian Rupees.
- Address Proof Type – The document provided as proof of address, such as an Aadhaar UID Card.
- Property Address & Pincode – The location details of the property, including address and postal code.
- Profile Segment Type – Indicates the borrower’s financial segment, such as “Bank Salary”.
- Net Income – The borrower’s declared annual income, which helps in assessing loan eligibility.
- Deductions – Shows any existing deductions (₹25,000), which may impact the loan repayment capacity.
- Expected Retirement Age – This field captures the borrower’s anticipated retirement age (e.g., 58). It is crucial in determining the loan tenure, as lenders ensure that loan repayment aligns with the applicant’s active earning period.
- Purpose – A dropdown field where the applicant selects the purpose of the loan, such as home purchase, construction, or renovation. This helps lenders categorize the loan appropriately.
- Branch Code – Specifies the branch handling the loan application (e.g., “Digital Branch”). It ensures the application is processed through the correct financial institution channel.
- Sales Person – A field to enter the sales representative or loan officer assisting with the application. This helps track the responsible agent for better service and follow-ups.
- Continue Button – A red button at the bottom that allows the user to proceed to the next step of the loan application process after all required details are filled.
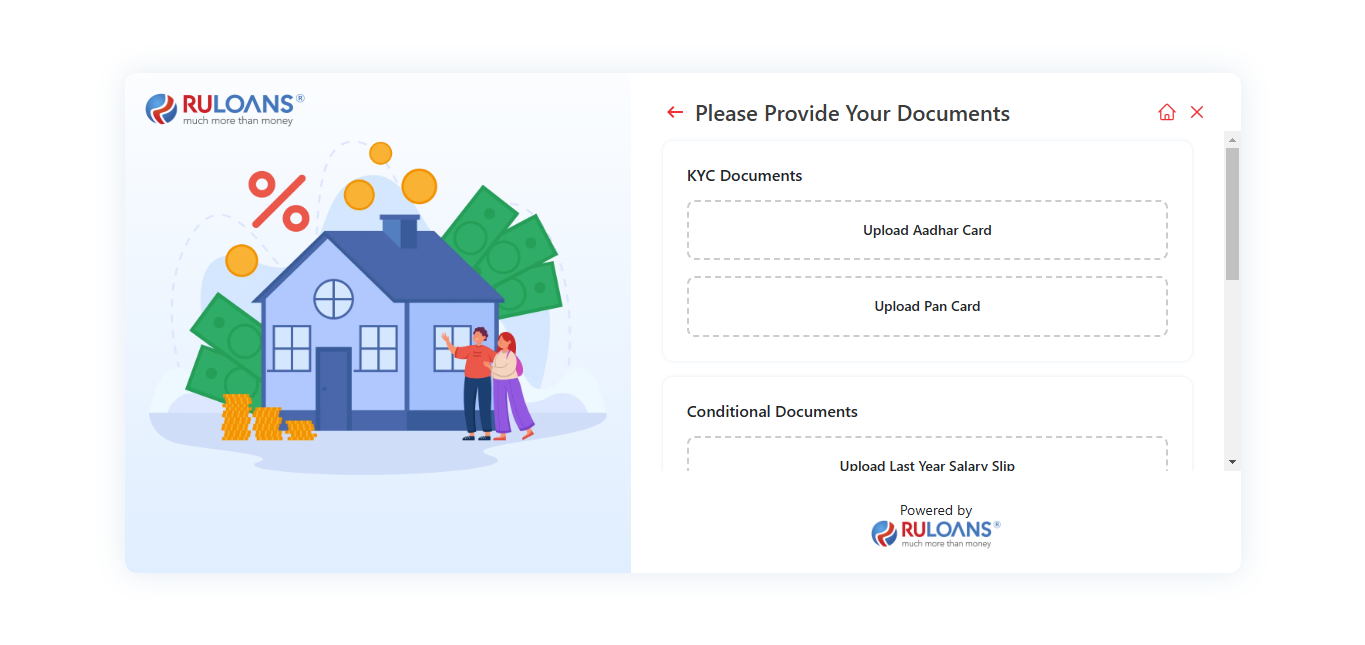
Step 20: Document Upload for KYC and Conditional Documents
This step focuses on the document submission process. This step involves uploading essential KYC and conditional documents for verification. Details:- KYC Documents:
- Upload Aadhar Card
- Upload PAN Card
- Conditional Documents:
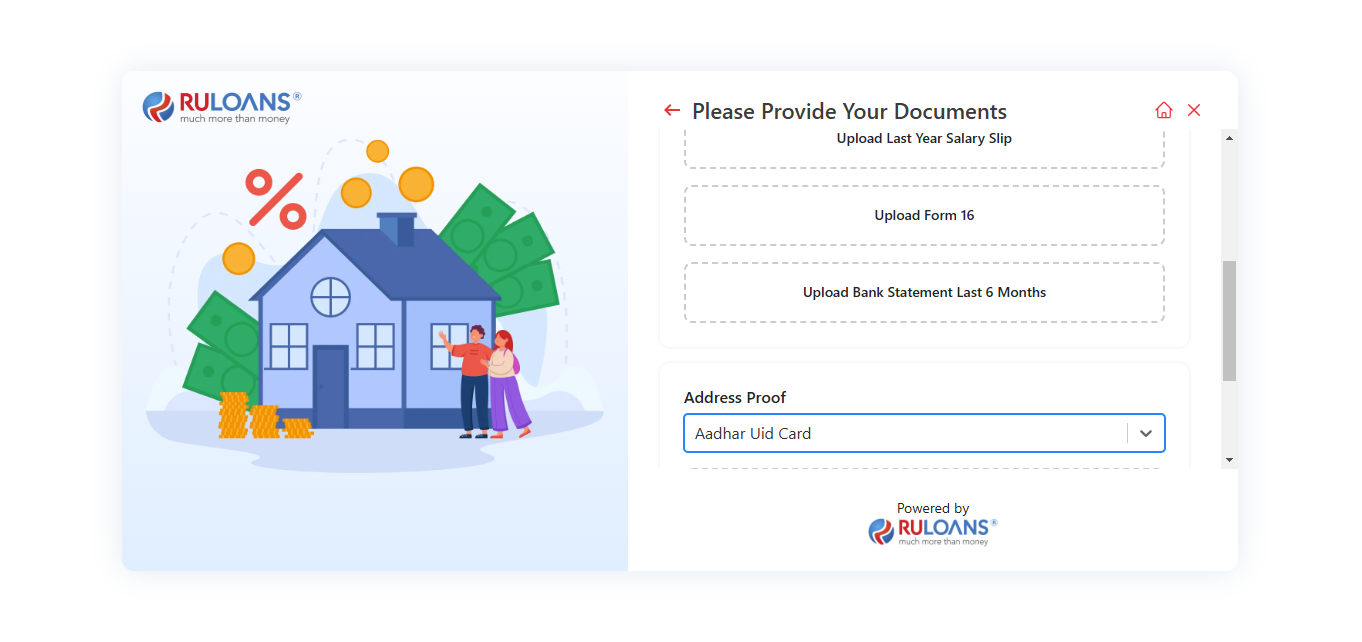
- Upload Last Year Salary Slip (only if applicable based on loan type)
- Upload Form 16: Form 16 is a tax document issued by employers to salaried employees in India. It serves as proof of the employee’s income and the tax deducted at source (TDS).
- Upload Bank Statement (Last 6 Months): A bank statement provides a detailed account of the applicant’s financial transactions and balances over a period of six months.
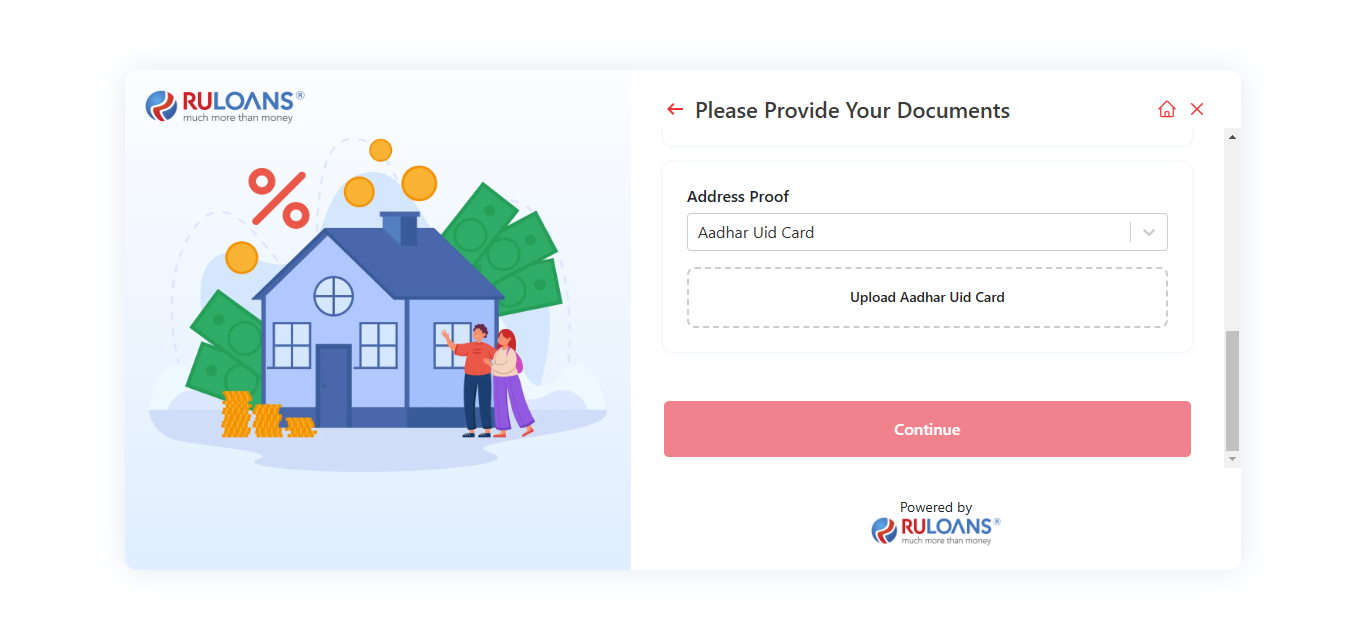
- Address Proof: Address proof documents are required to verify the applicant’s current residential address.
Step 21: Application Submission Confirmation
Description: This step displays a confirmation message after the loan application is successfully submitted. Key Information Displayed:- Application ID: A unique identifier (e.g., 961cd6a1-52b5-49e7-8758-b2e57e34e243) is generated for tracking the application status.
- Support Information: The user is informed that a support executive will contact them within 24 to 48 hours.
- Contact Details: Provides the customer service number 1800 266 7576 and support email [email protected] for any assistance.
- Copy Application ID: A button is provided to easily copy the Application ID for future reference.
- Navigation: A “Go back to Home” link is available to return to the main page.