Objective
The objective of this section is to enable users to efficiently manage, track, and process bills in the CRM Platform. By utilizing the Bills section, users can view, update, and track the status of various bills for faster approvals and better management.Process Steps
Step 1: Login to the CRM.
The user logs in using their provided credentials.Upon successful login, the user will be redirected to landing page.
Step 2: Navigate to the Bills Section
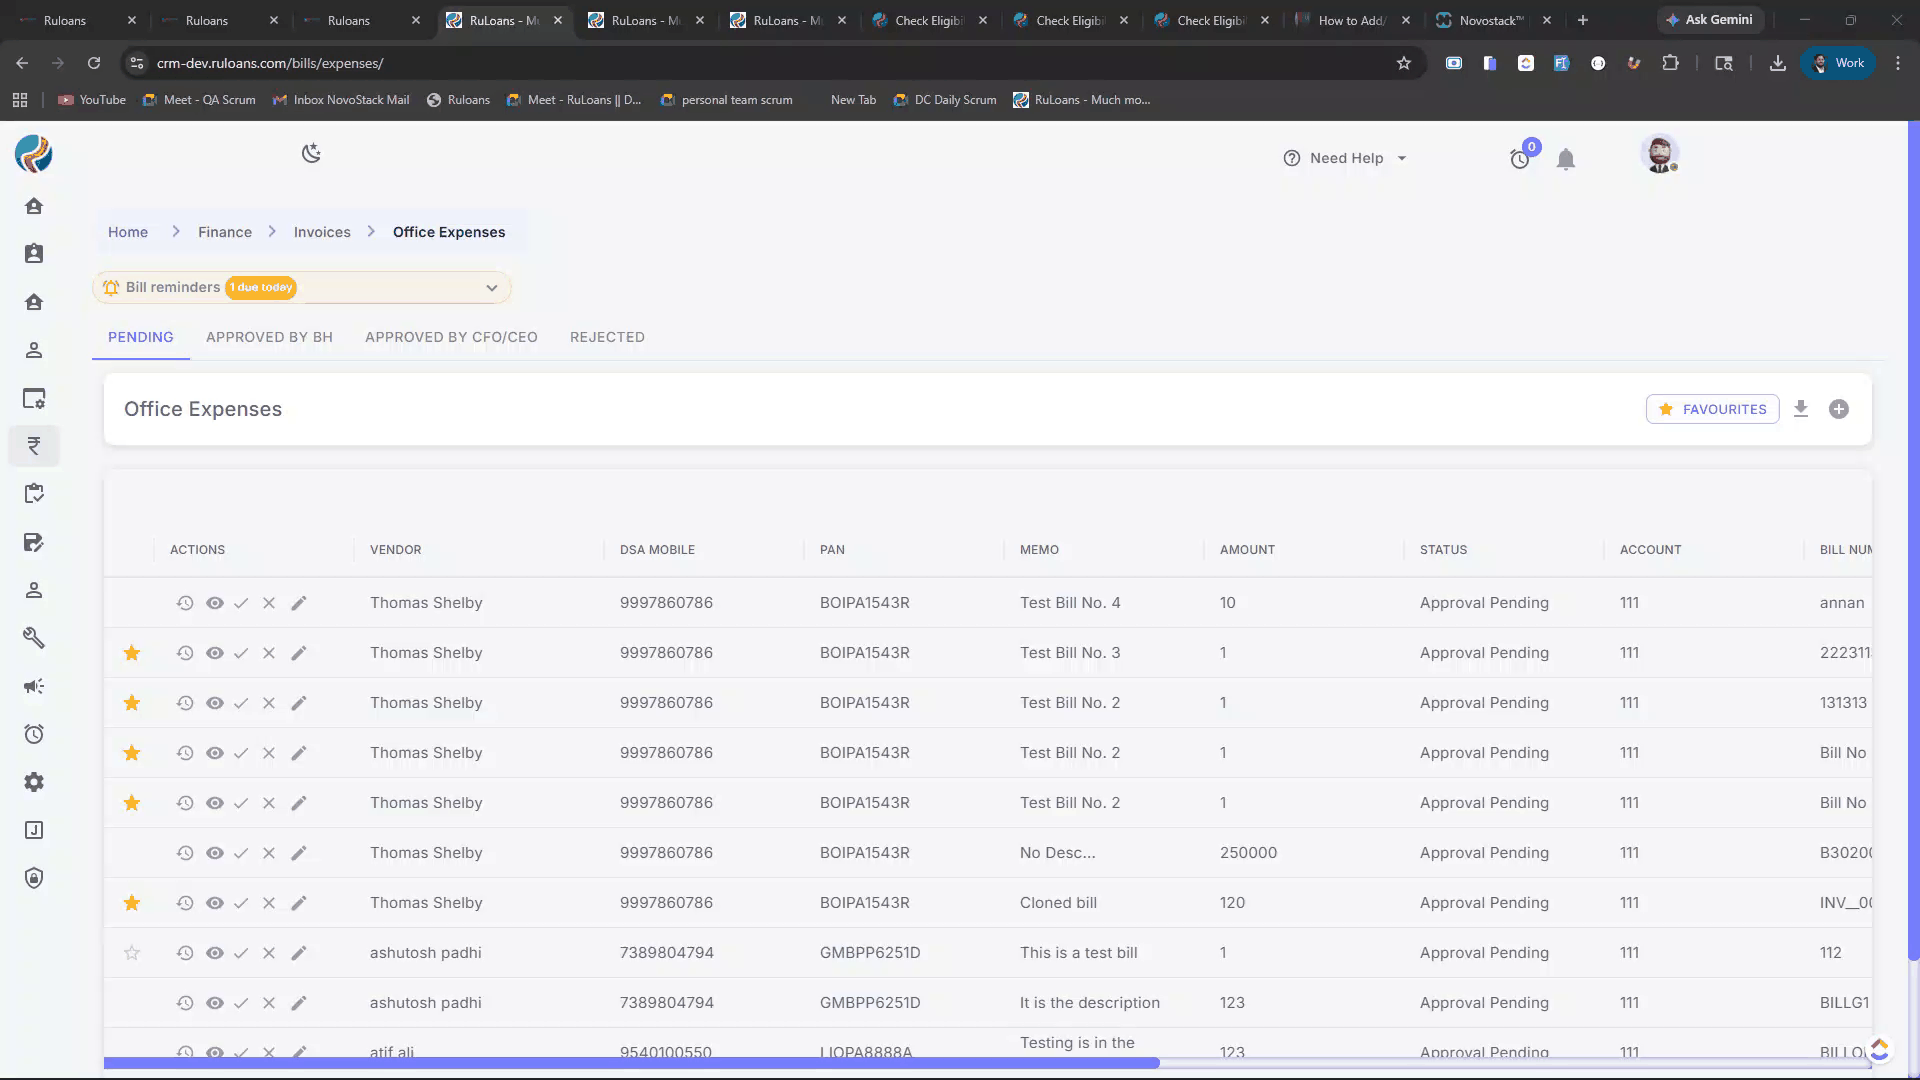
Access the Bills section by clicking on the Finance > Invoices > Office Expenses tab in the main menu on the left.The system will redirect the user to the Bills Page.
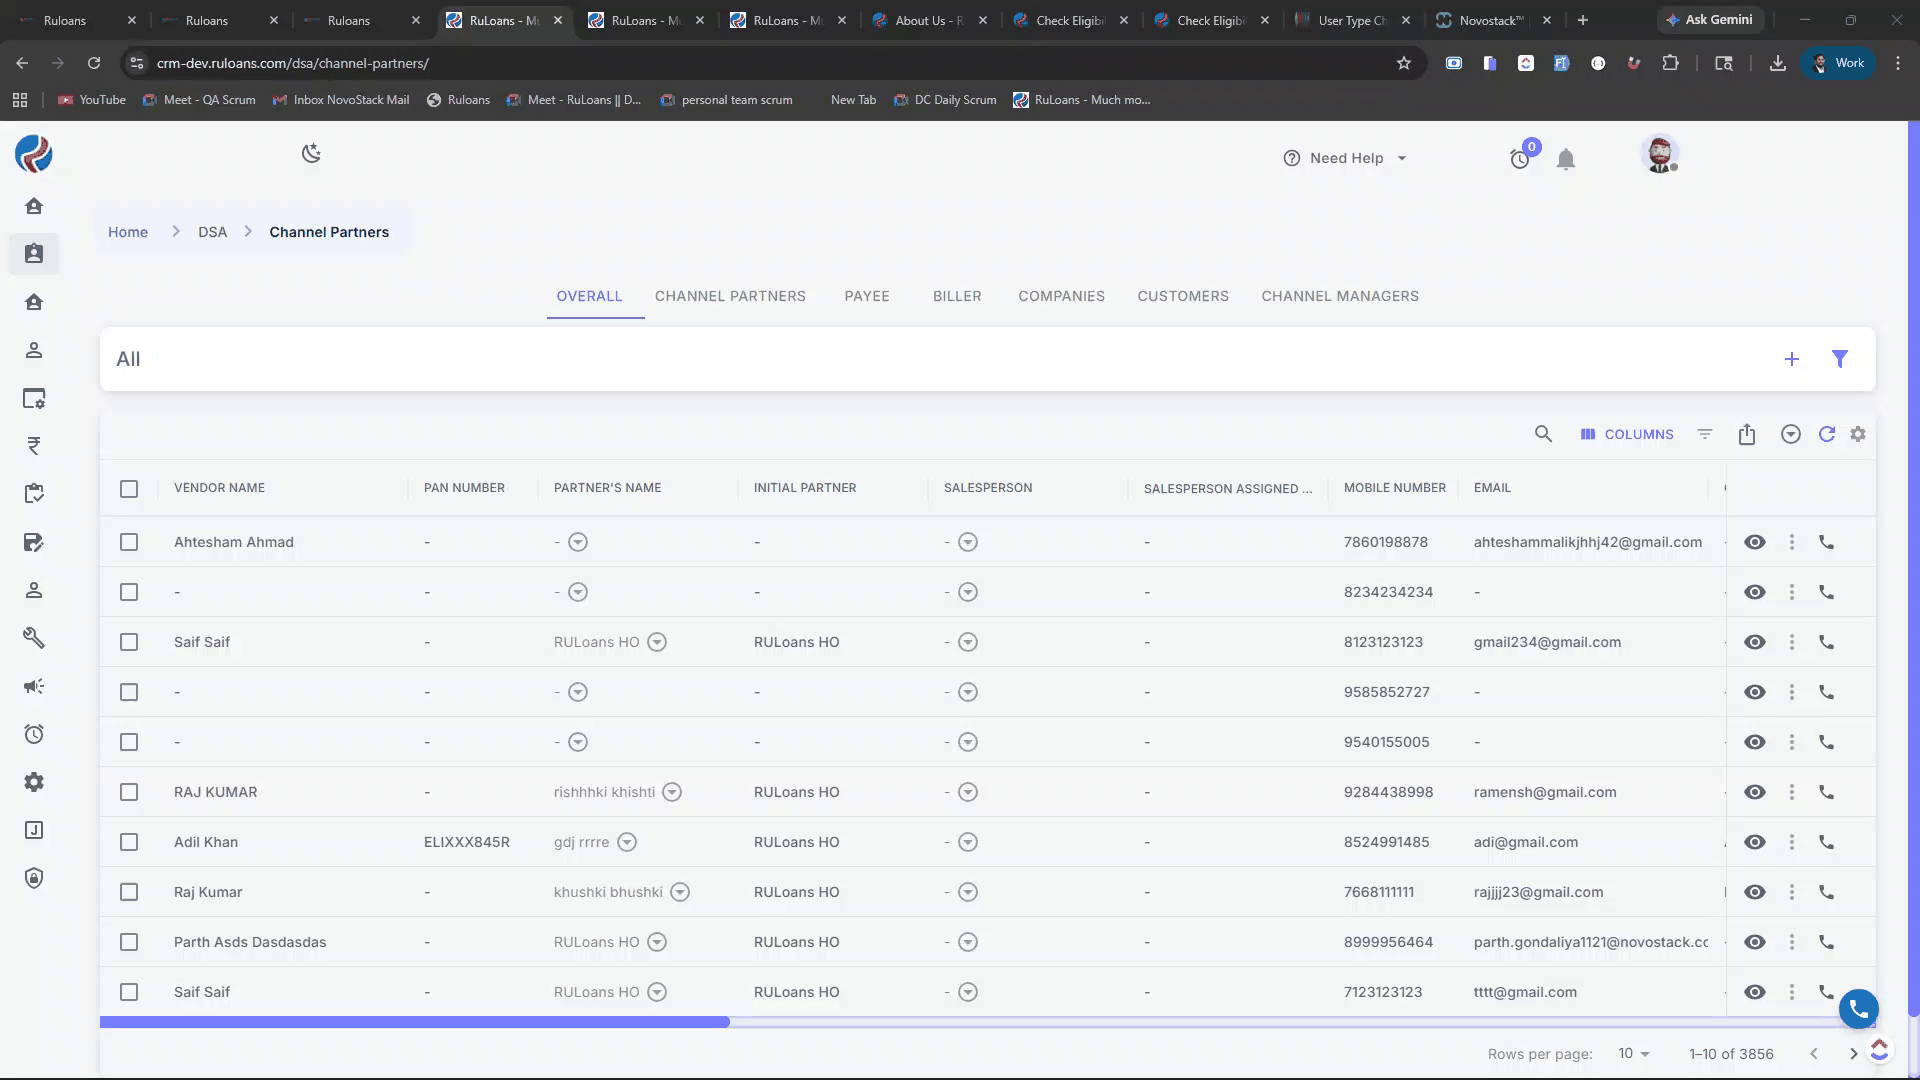
Step 3: Overview of the Bills Page
The following sections will be displayed:Tabs for different bill statuses:
- Pending
- Approved by BH
- Approved by CFO/CEO
- Rejected
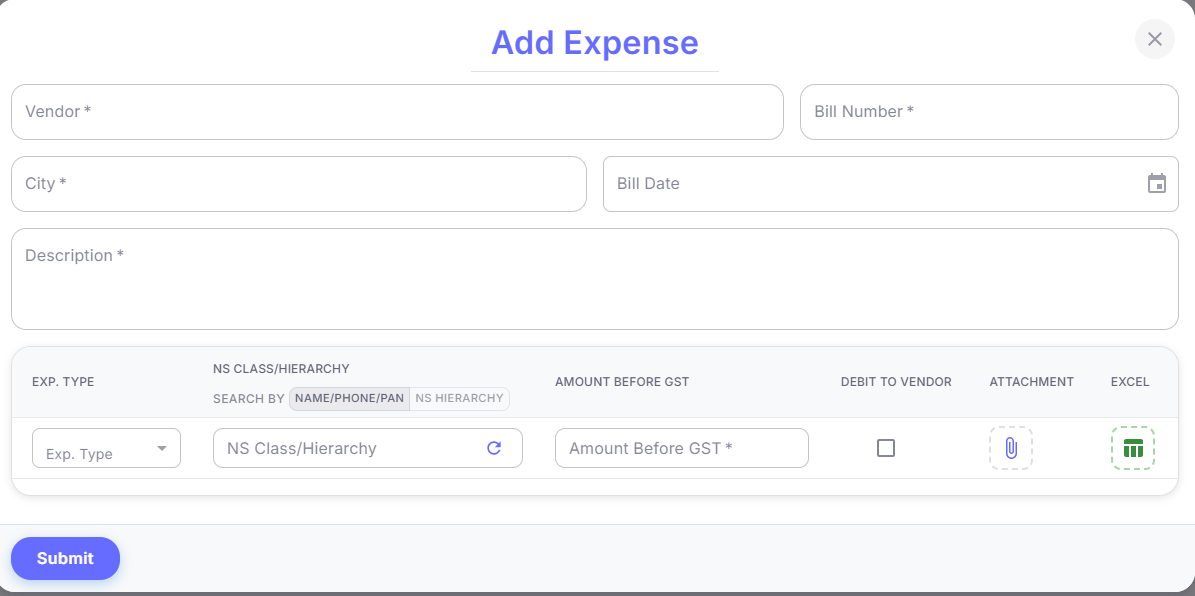
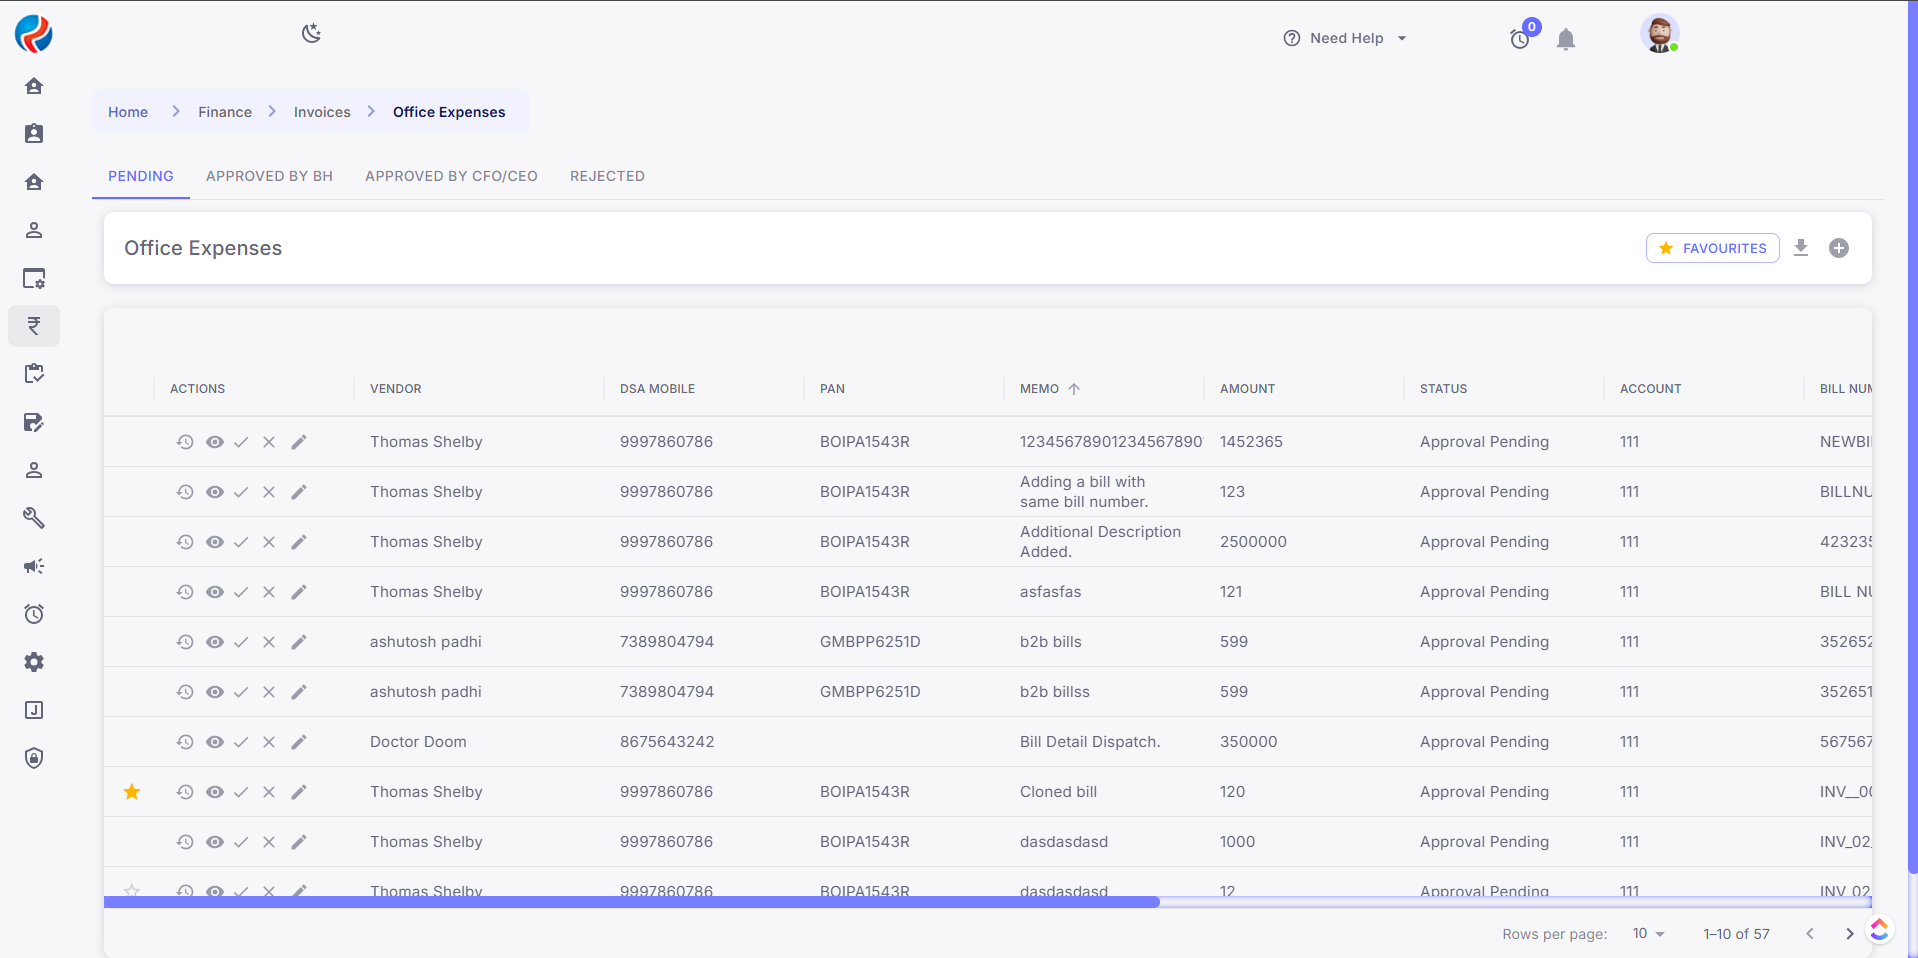 The Add New Bill or + button is used to create a new bill entry, which will reflect in the Pending section by default.
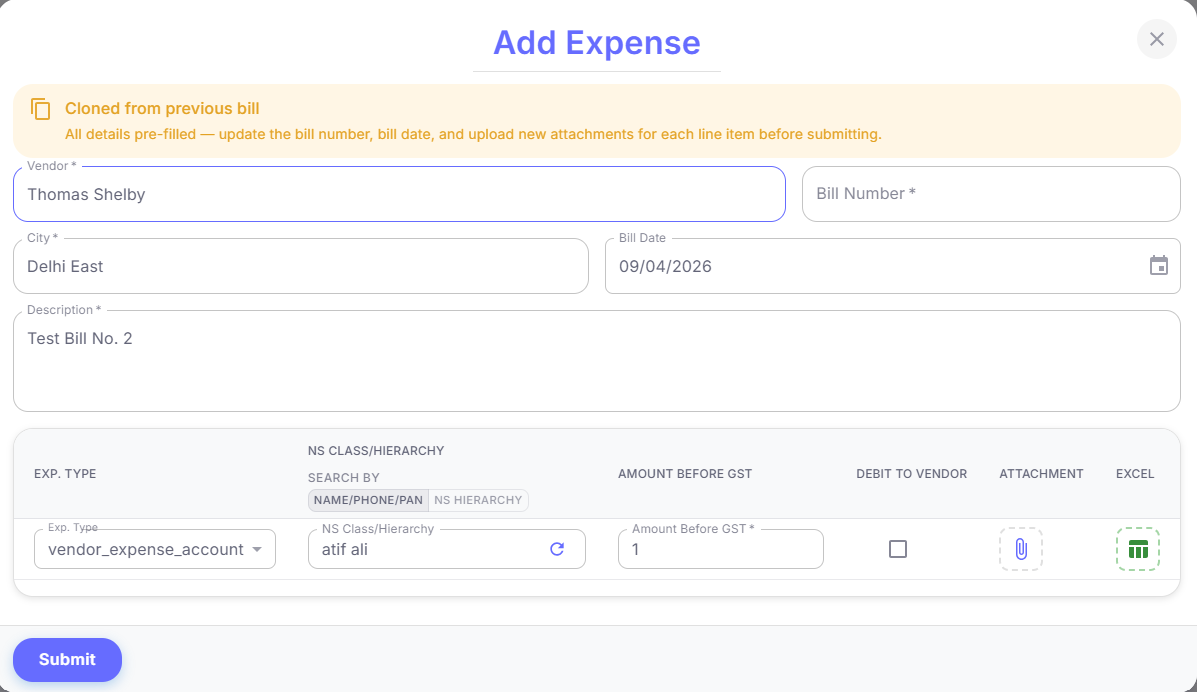
Fields available while adding a bill:
The Add New Bill or + button is used to create a new bill entry, which will reflect in the Pending section by default.
Fields available while adding a bill:
- Vendor – The user is required to select or enter the Vendor for the bill. This could be the supplier or service provider associated with the bill.
- Bill Number – A unique number identifying the bill. This field is mandatory for identification and tracking.
- City – The user is required to select the city for the bill.
- Bill Date – The date when the bill was generated or received.
- Description – A brief description of the expense or service for which the bill was generated.
- Expense Type – A dropdown menu for the user to select the type of expense (e.g., travel, office supplies, etc.).
- Name/Phone/PAN or NS Class/Hierarchy – A field related to the classification or hierarchy for accounting or internal categorization.
- Amount Before GST – The amount before applying GST (Goods and Services Tax). This helps in calculating the total payable amount after tax.
- Debit to Vendor – A checkbox option to mark whether the expense should be debited to the vendor, indicating that this amount will be due from the vendor.
- Attachment – An option to upload related documents or receipts for the bill (indicated by the paperclip icon).
- Submit – After filling in all the necessary information, the user can click on Submit to save the expense and add it to the system.
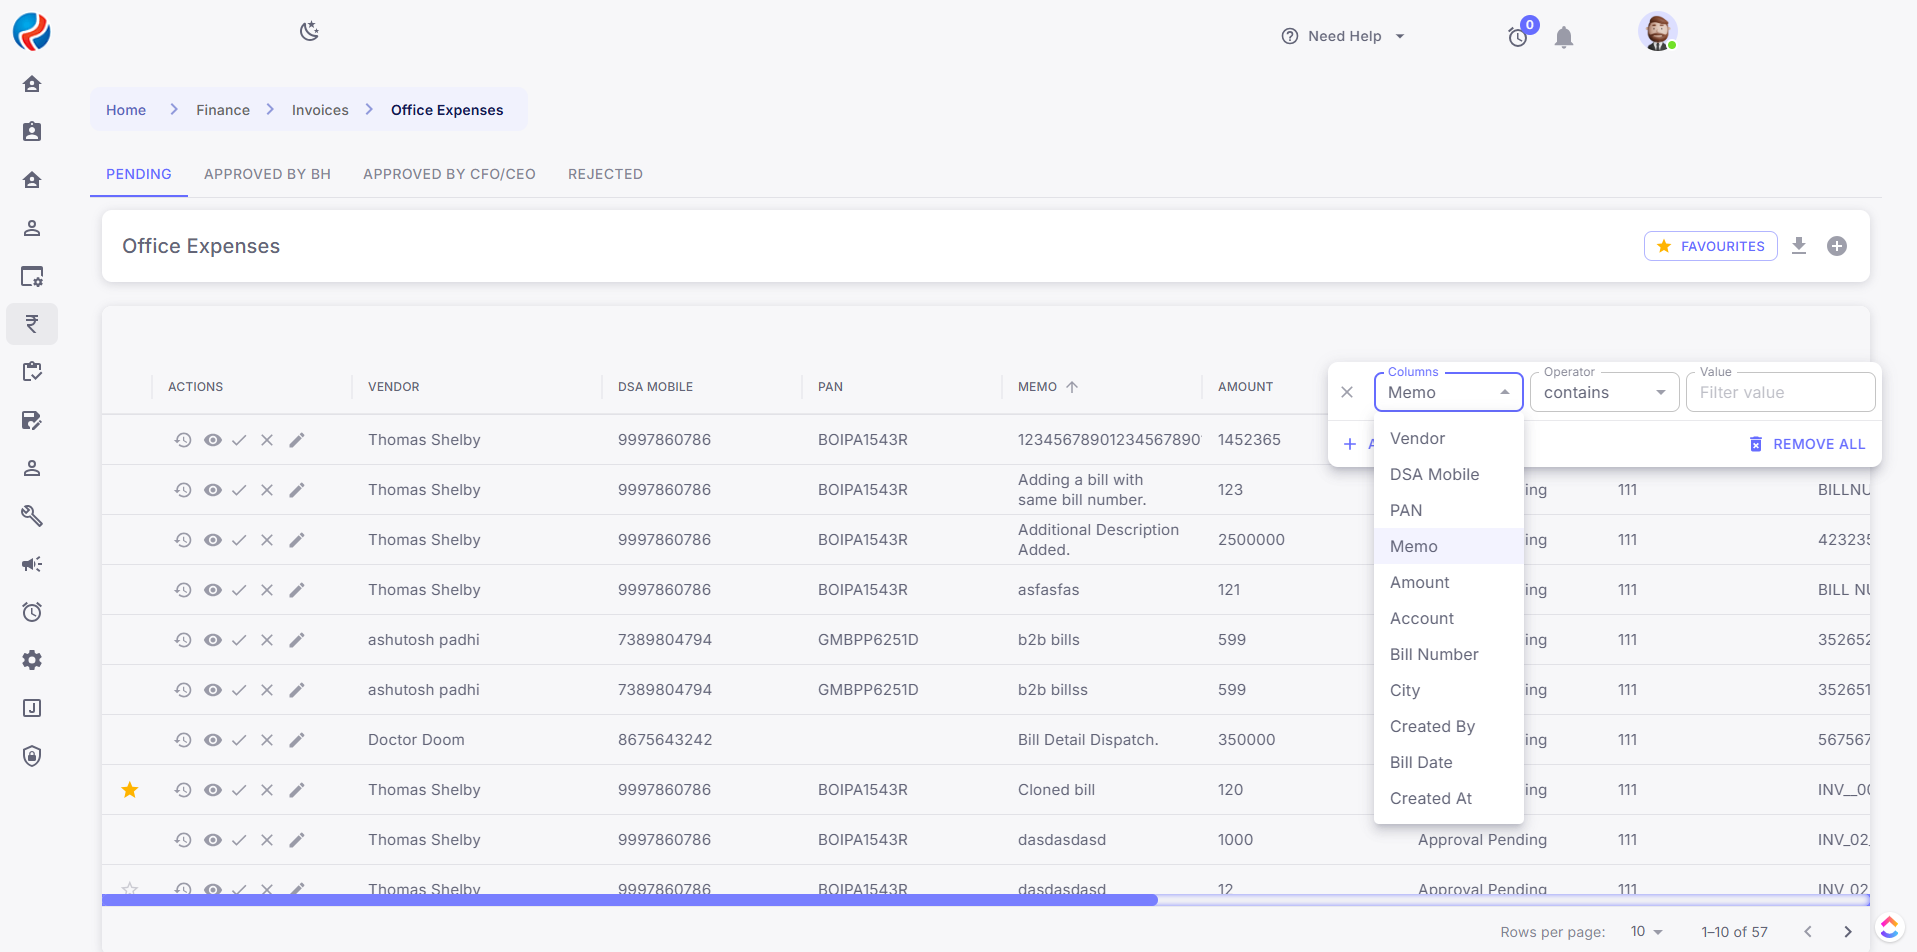
Step 4: Search and Filter Bills
Users can search and filter bills using the following options:- Vendor Name – Search by vendor name
- DSA Mobile – Search by DSA mobile number in their Hierarchy.
- PAN – Search by DSA PAN in their Hierarchy.
- Memo – Search by Bill Memo.
- Amount - Search by bill amount.
- Bill Number - Search by bill number.
- City - Search by city.
- Created By - Search by the user who created the bill.
- Bill Date - Search by bill date when the bill is dated.
- Created Date - Search by the date bill is created on.
Step 5: Actions on Bills
View Bill
Click View to see detailed bill information.Edit Bill
Click Edit to modify an existing bill. Note - Other Actions available only for the User with Access from RBAC.Approve Bill
Click Approve to approve the selected bill.Reject Bill
Click Reject to Reject the selected bill.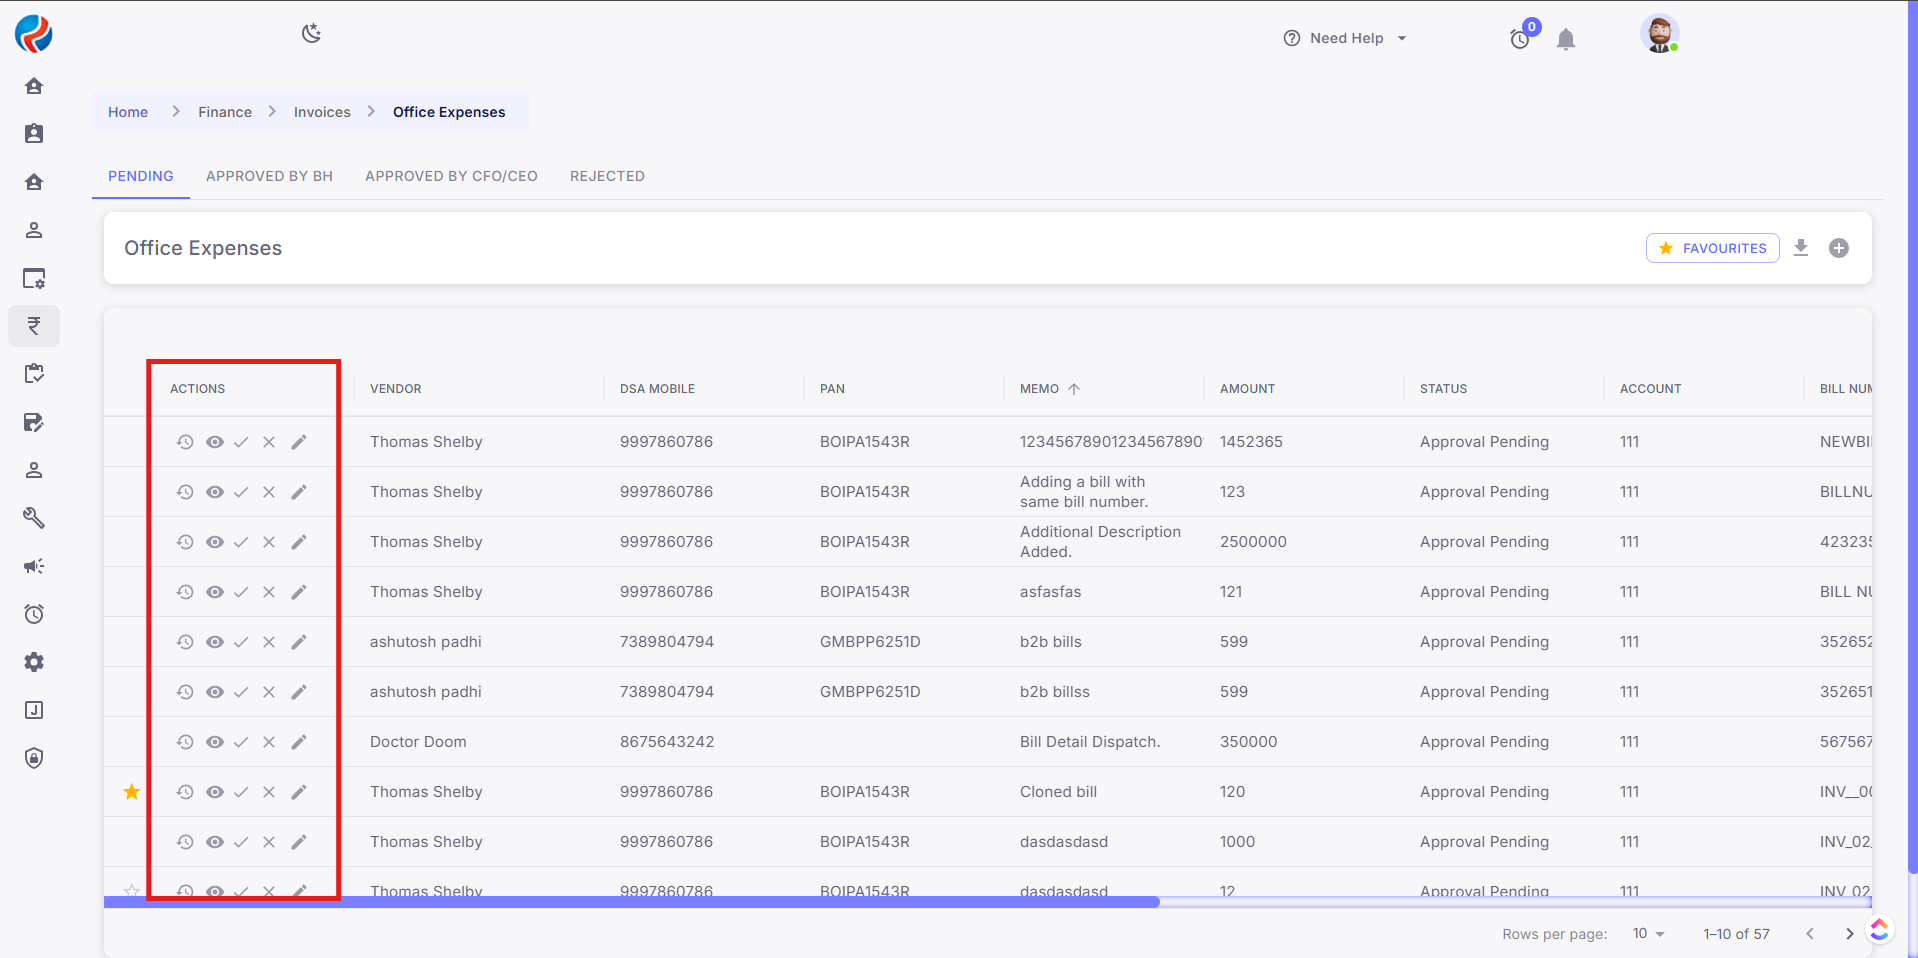
Step 6: Bill Tracking and Status Updates
Each bill displays its current status such as:- Pending
- Approved by BH
- Approved by CFO/CEO
- Rejected
Step 7: Favourites bills section
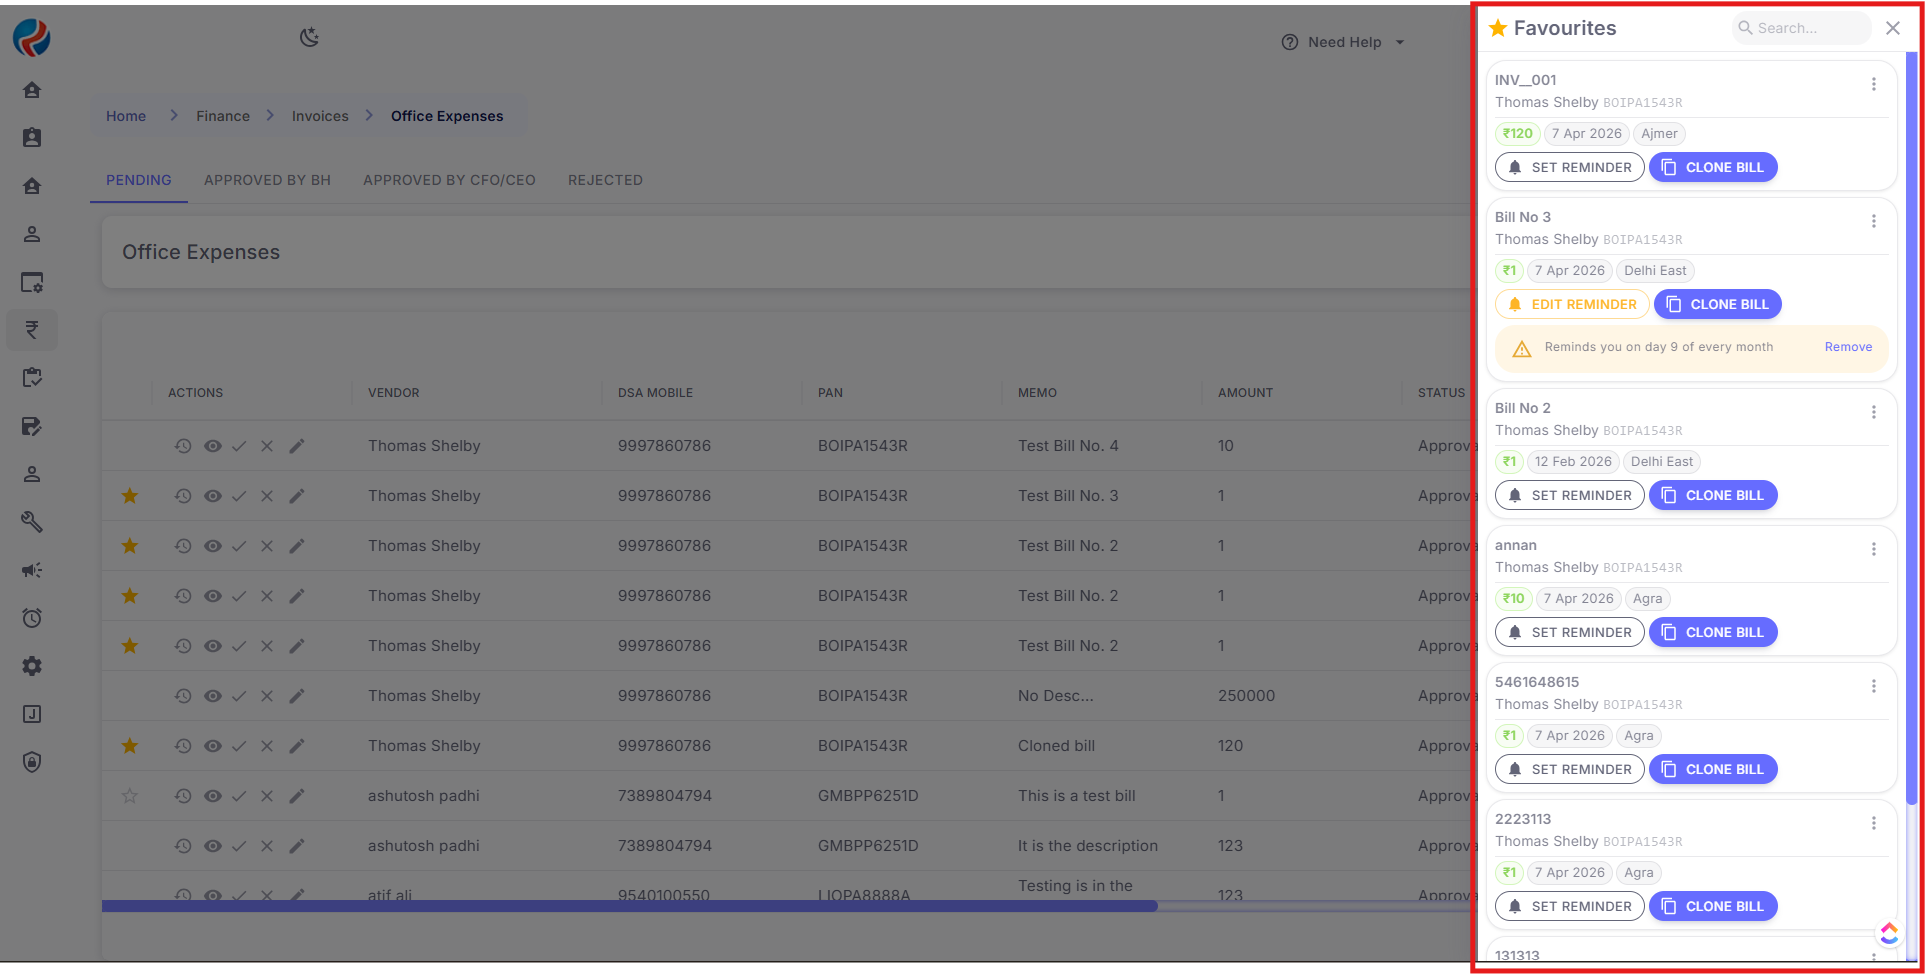
User can now add Bills to their Favourites to set remainders to their bills. User can add bill to Favourites by clicking on Favourite or Star Icon.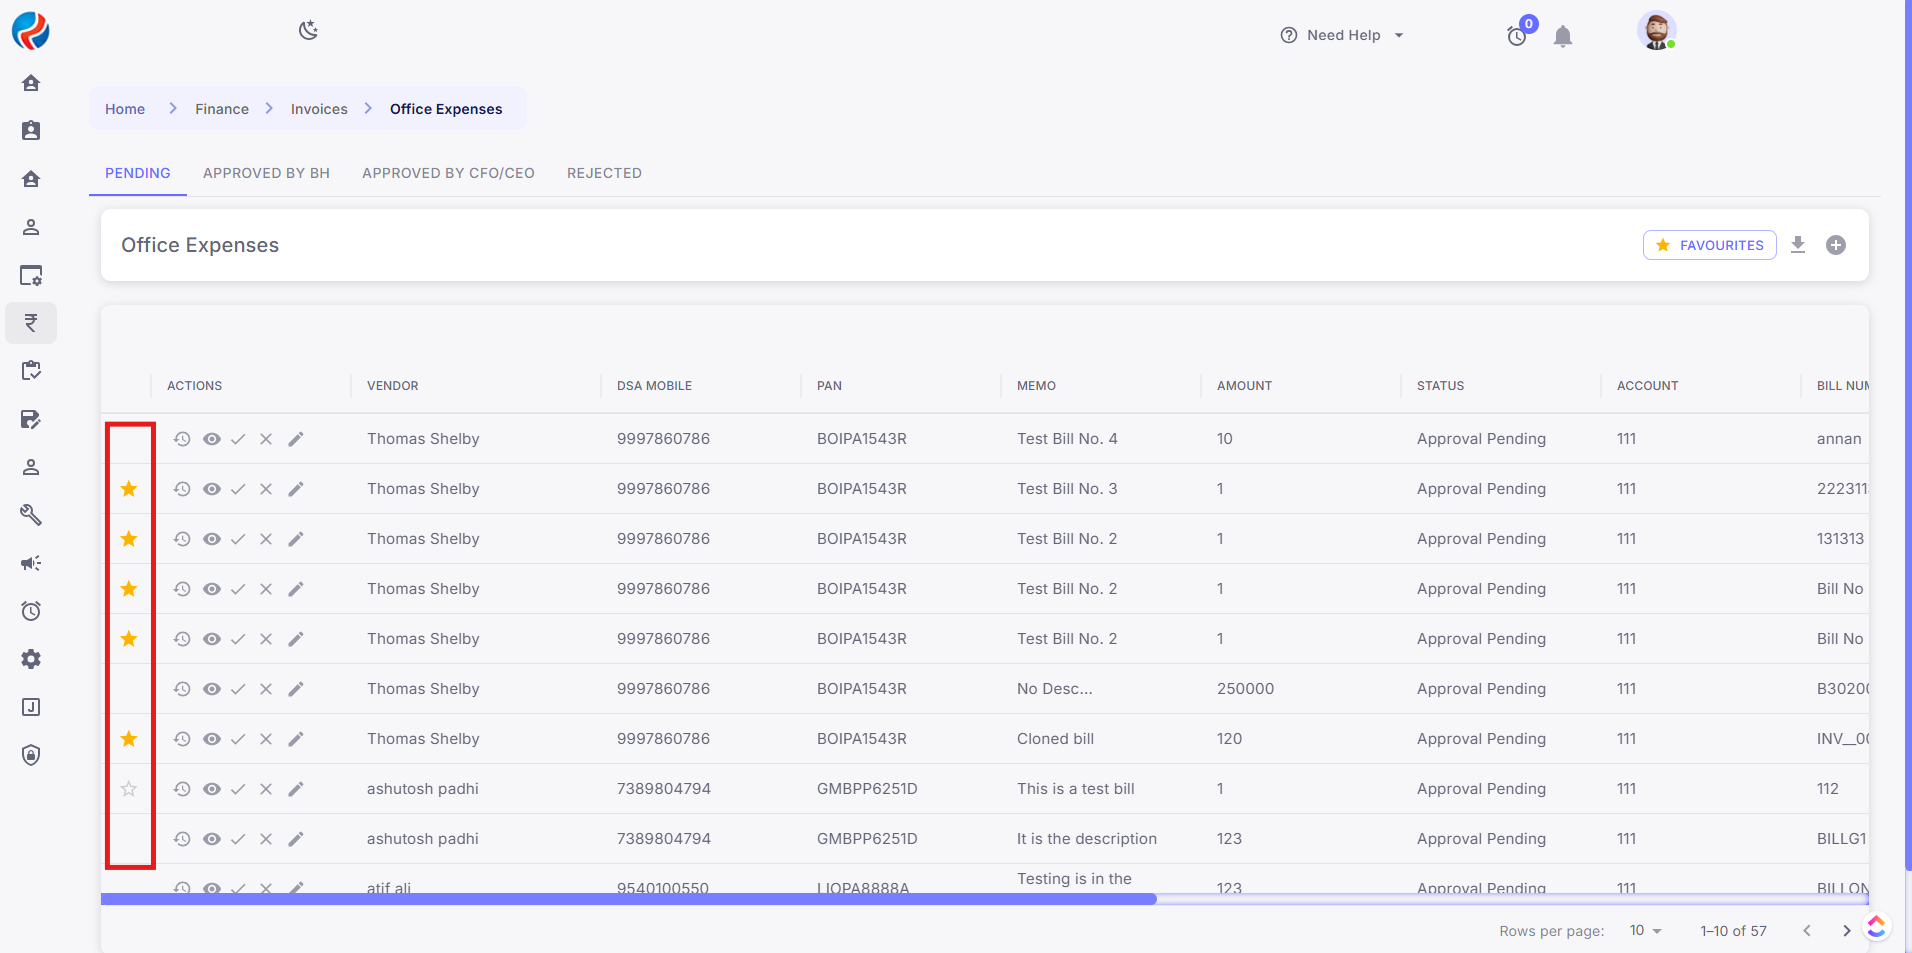 The Favourites Section displays the bills added to this section.
Other Details shown inside this section is:
The Favourites Section displays the bills added to this section.
Other Details shown inside this section is:
- Bill Number
- Vendor Name
- Vendor PAN
- Amount
- Date of the Bill
- City
- Set Reminder button
- Clone Bill button
Step 8: Set Reminder and Clone Bill section
User can set reminder to the favourite bills also clone a bill if same bill with different date is to be created. Set Reminder When clicked on the set reminder button user will see a pop-up which contains:- Reminder Label - Shown on the Reminder card for the user.
- Reminder Date - The date reminder should be shown to the user of every month.
- Cancel Button - Cancel the reminder pop-up.
- Save Reminder - To save the reminder for the bill for the date.
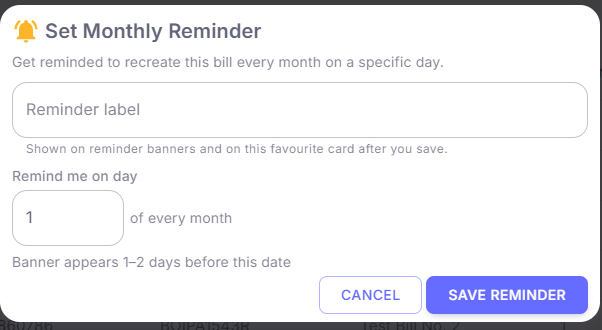 Note - The reminder will be visible to the user on the date set for the reminder of the bill.
Clone Bill
When clicked on the clone bill button user will see the add expense pop-up with an text in yellow “Cloned from previous bill”
User will see most of the details pre-filled, user can change the bill number and other details.
Note - The reminder will be visible to the user on the date set for the reminder of the bill.
Clone Bill
When clicked on the clone bill button user will see the add expense pop-up with an text in yellow “Cloned from previous bill”
User will see most of the details pre-filled, user can change the bill number and other details.
 Reminder and clone bill from reminder
Conclusion
By following the above structured steps, users can:- Track and manage bills efficiently until completion
- Sync all bill-related data for full visibility and faster processing